Introduction
In the ever-evolving landscape of data management, Snowflake has emerged as a revolutionary cloud-based data warehousing solution. Snowflake is a fully-managed service that provides a single platform for data warehousing, data lakes, data engineering, data science, and data application development. Snowflake is designed to support a wide range of data workloads, from traditional batch data processing to real-time analytics and machine learning.
In this post, I will guide you through the process of getting started with Snowflake and integrating it with your AWS
account to begin importing data from AWS. This tutorial assumes you have an existing AWS account and some AWS knowledge.
If you don’t have an account, you can create a free one here.
Architectural Diagram
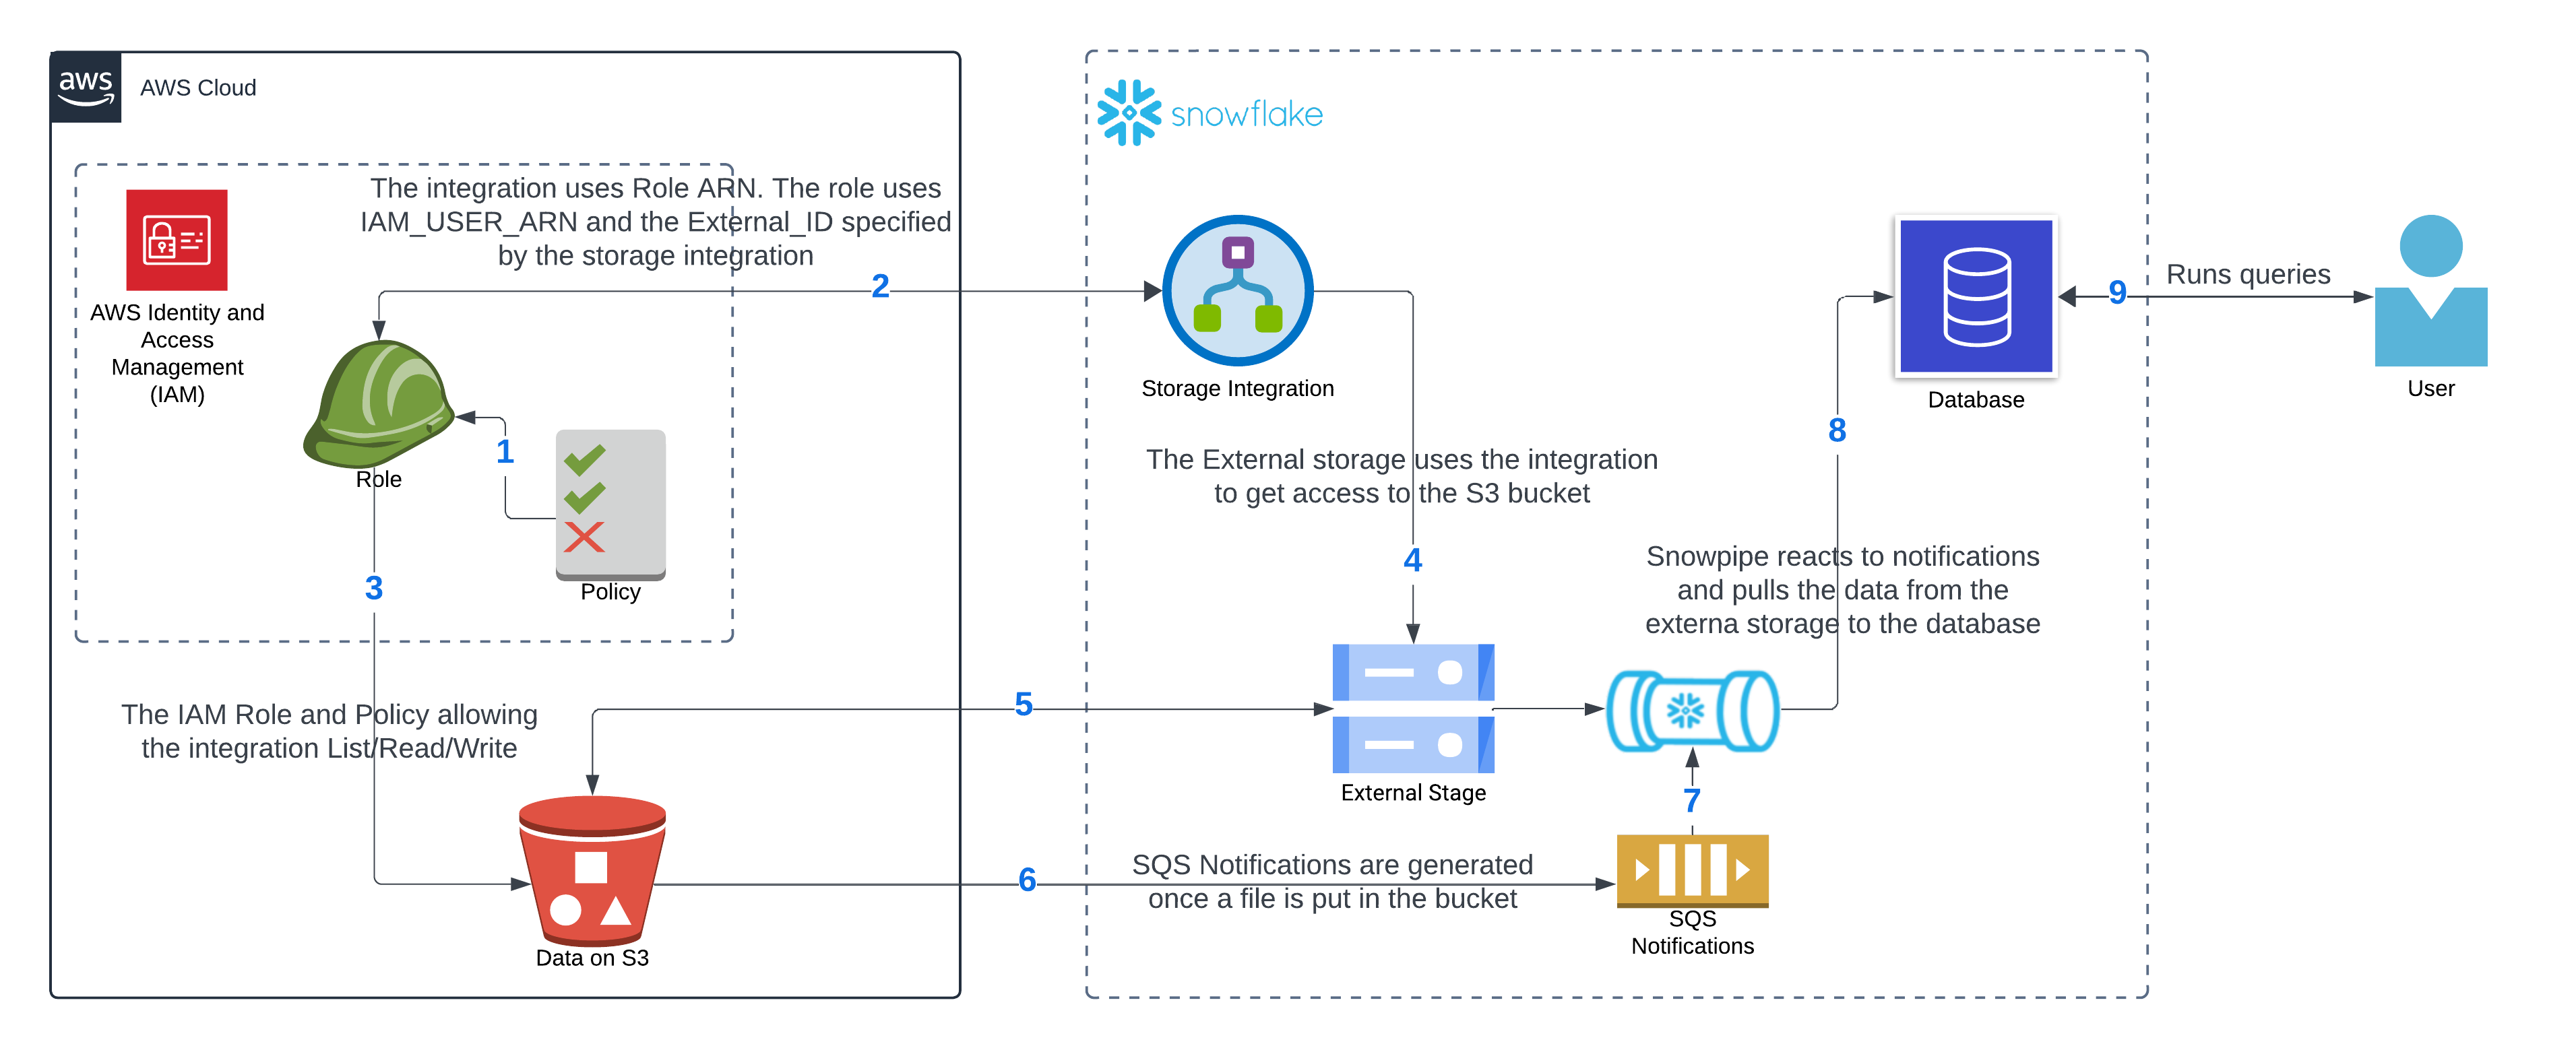
The diagram shows all the pieces we need to accomplish connecting Snowflake to AWS and continuously receive data that the user can query using Snowsight (this is the name that Snowflake gives to its web application) or any other connection to the database.
In the AWS account, you will need to create a Role. A policy needs to be attached to such role to allow List/Read/Write into the S3 bucket. The Role will also establish a trust relationship with Snowflake’s storage integration. We need to create the storage integration in Snowflake.
The Storage integration will need the Role’s ARN, and once created, it will provide us with the IAM_USER_ARN and the External_ID that must be put in the previously created Role in AWS. In addition, we need to create an external storage where we can leverage the access from the storage integration to access the files in the S3 bucket. The external storage is then able to List/Write/Read files from the S3 bucket.
Finally, we need a Snowpipe to ingest the files from the external storage and put the data where we want to hold it. The Snowpipe provides a notification channel using SQS that must be applied into the S3 bucket for the automatic consumption of the data to work. Once the data is ingested the user can run queries. This diagram summarizes the architecture:
Creating a Snowflake account
Snowflake provides the ability to create a free account. The account lasts 30 days or $400 (at the time of writing) in credits. You can choose any of their account types Standard Edition, Enterprise Edition, or Business Critical Edition. The Standard Edition is the most basic account type with full access to all Snowflake standard features. The Enterprise Edition has additional features designed for the needs of large enterprises. The Business Critical Edition offers higher levels of protection tailored towards customers with sensitive data such as protected health information (PHI). You can read more about these in more detail on the Snowflake Website.
For our purposes, we will use the Standard Edition as the free credits will last longer, and we don’t need any special features to achieve the purposes of this post. In order to create a Snowflake account, go to their website here. There you can fill out basic information and select your account type. The process is easy and straightforward. After you follow the prompts and enter your information, including choosing the type of account we have previously discussed, you will get an email to confirm your email address and you will be able to login to your account. This video shows the process step-by-step.
Connect to AWS
In order to connect to AWS, you will need to create a Role to give Snowflake access. The role should have the corresponding policy to provide the appropriate access. The Snowflake integration will need a trusted relationship with AWS to be able to connect. In AWS, this is done by creating a third party trust relationship declared in the role. For such relationship, we will need the ARN and external ID from the Snowflake integration.
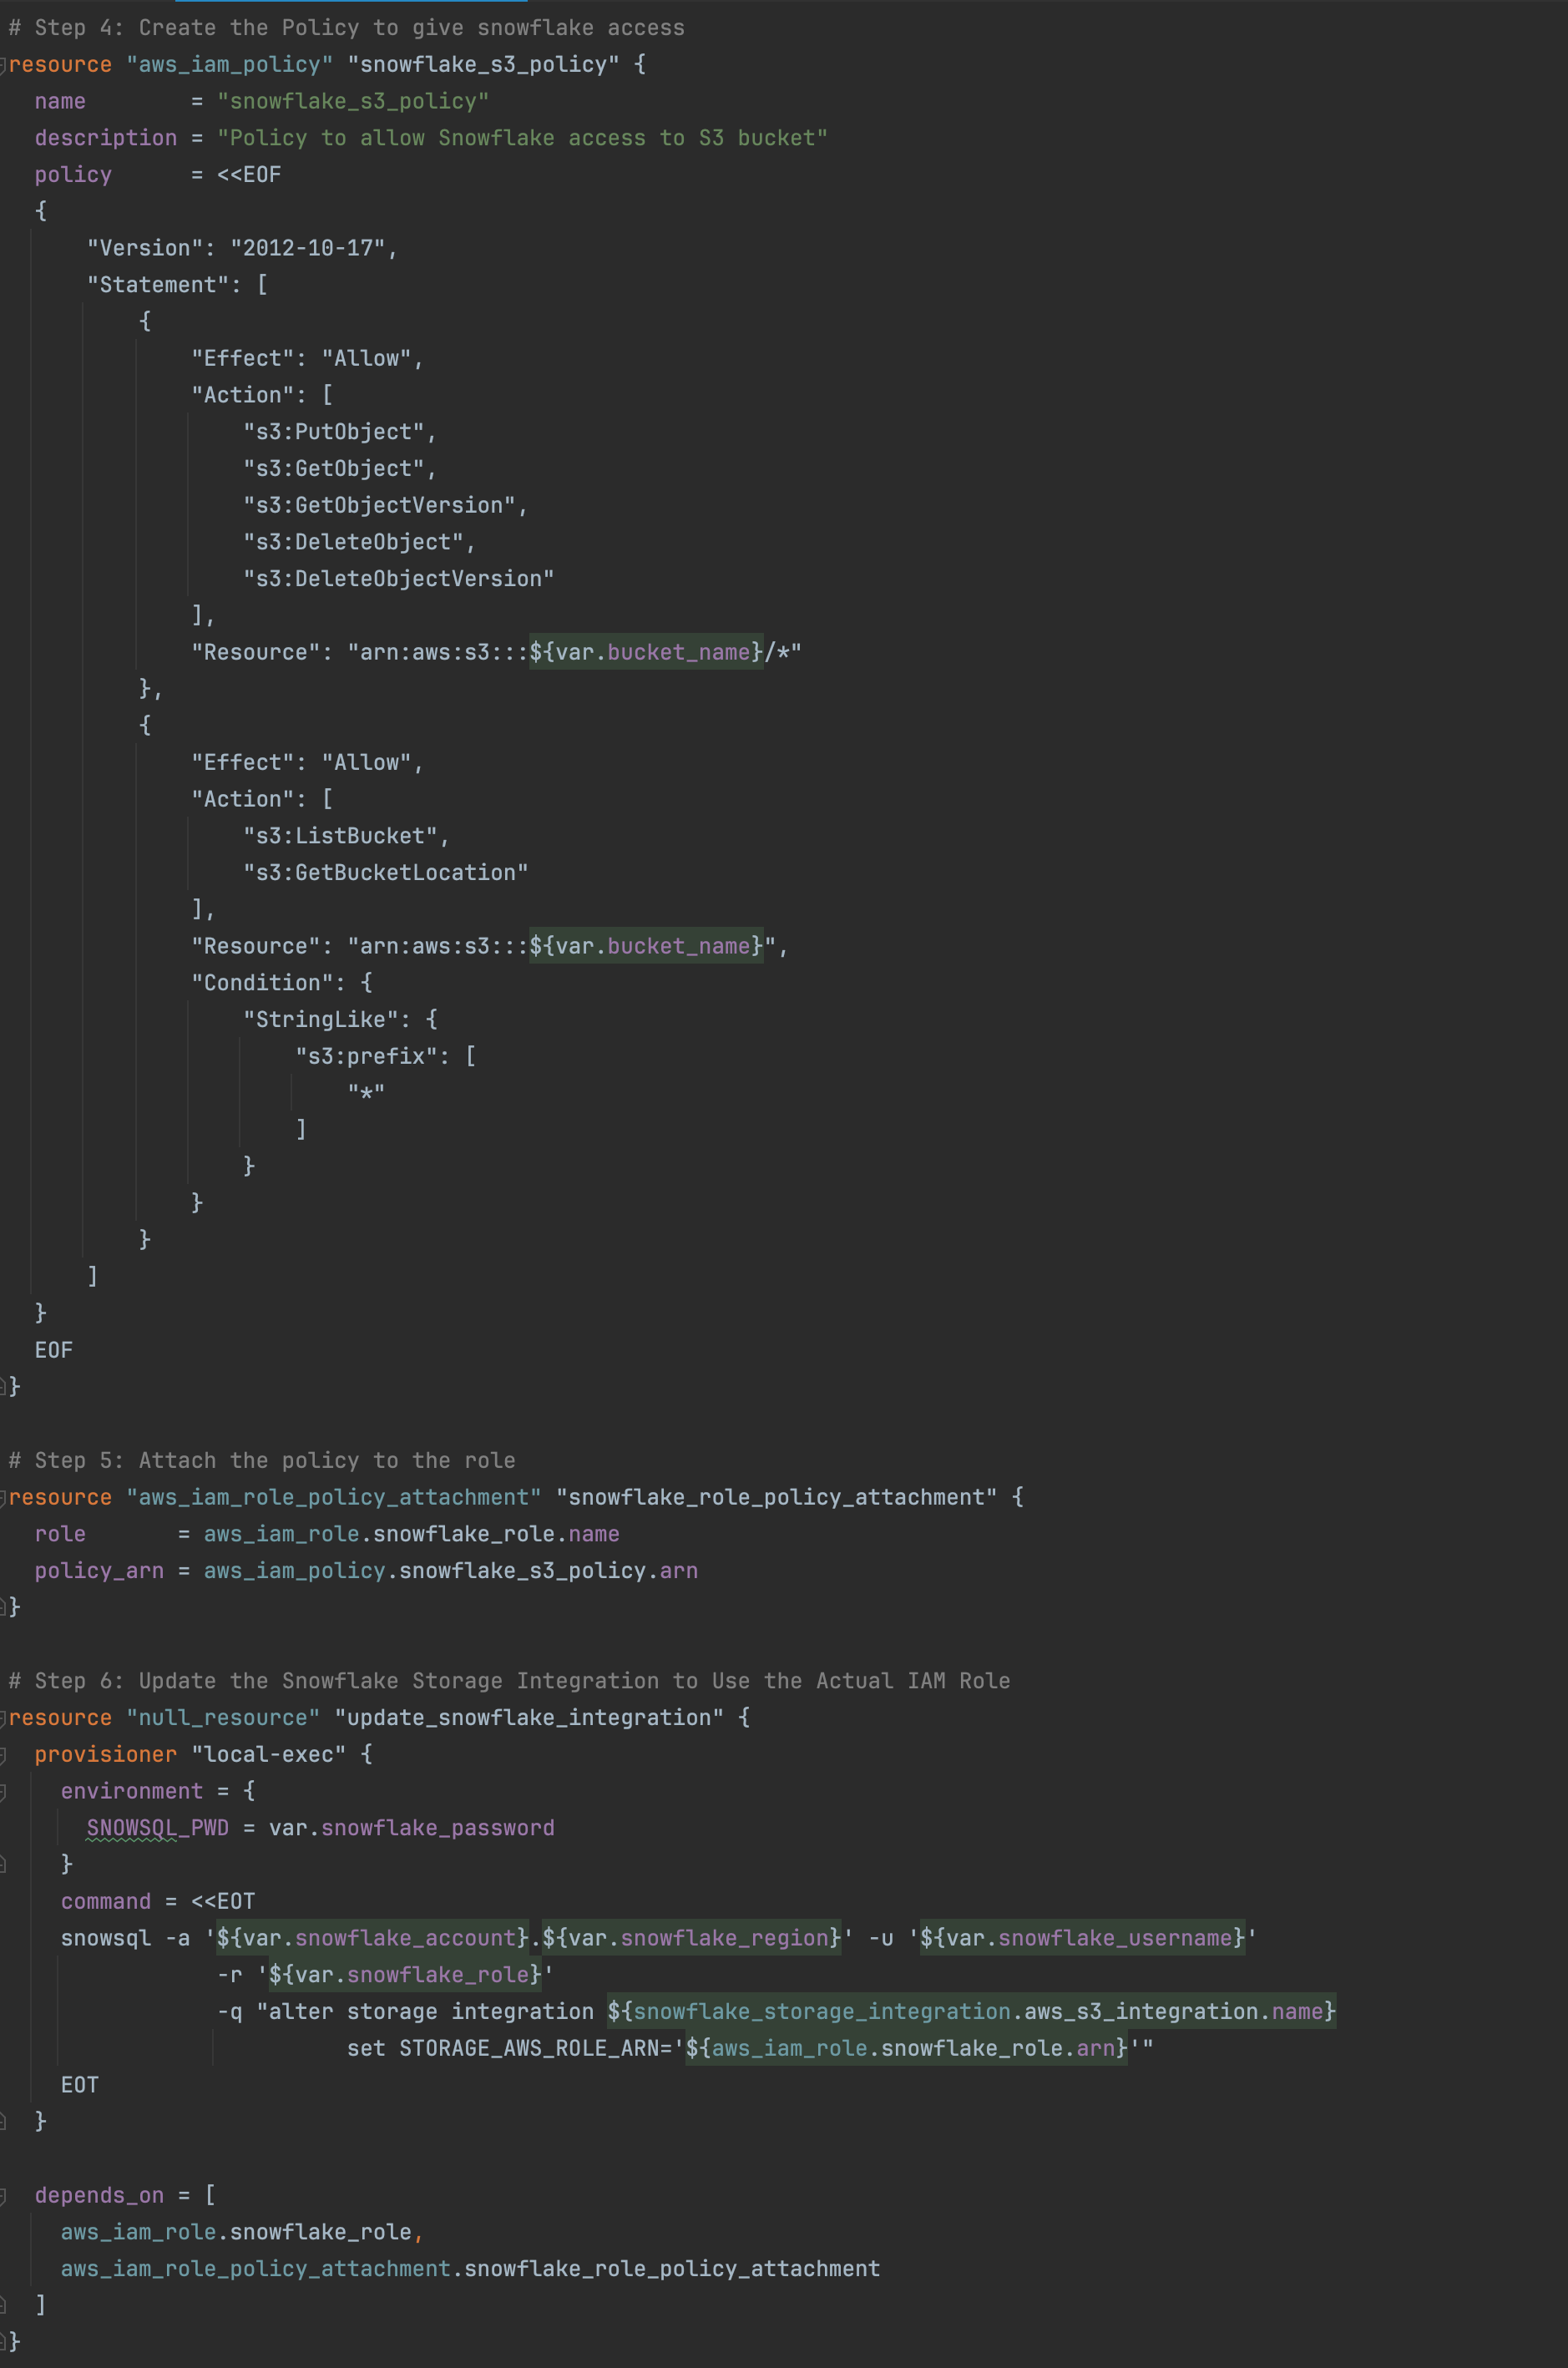
The policy that will be attached to this role needs to provide access to S3. We will give it access to list, put, and delete files.
Snowflake Integration
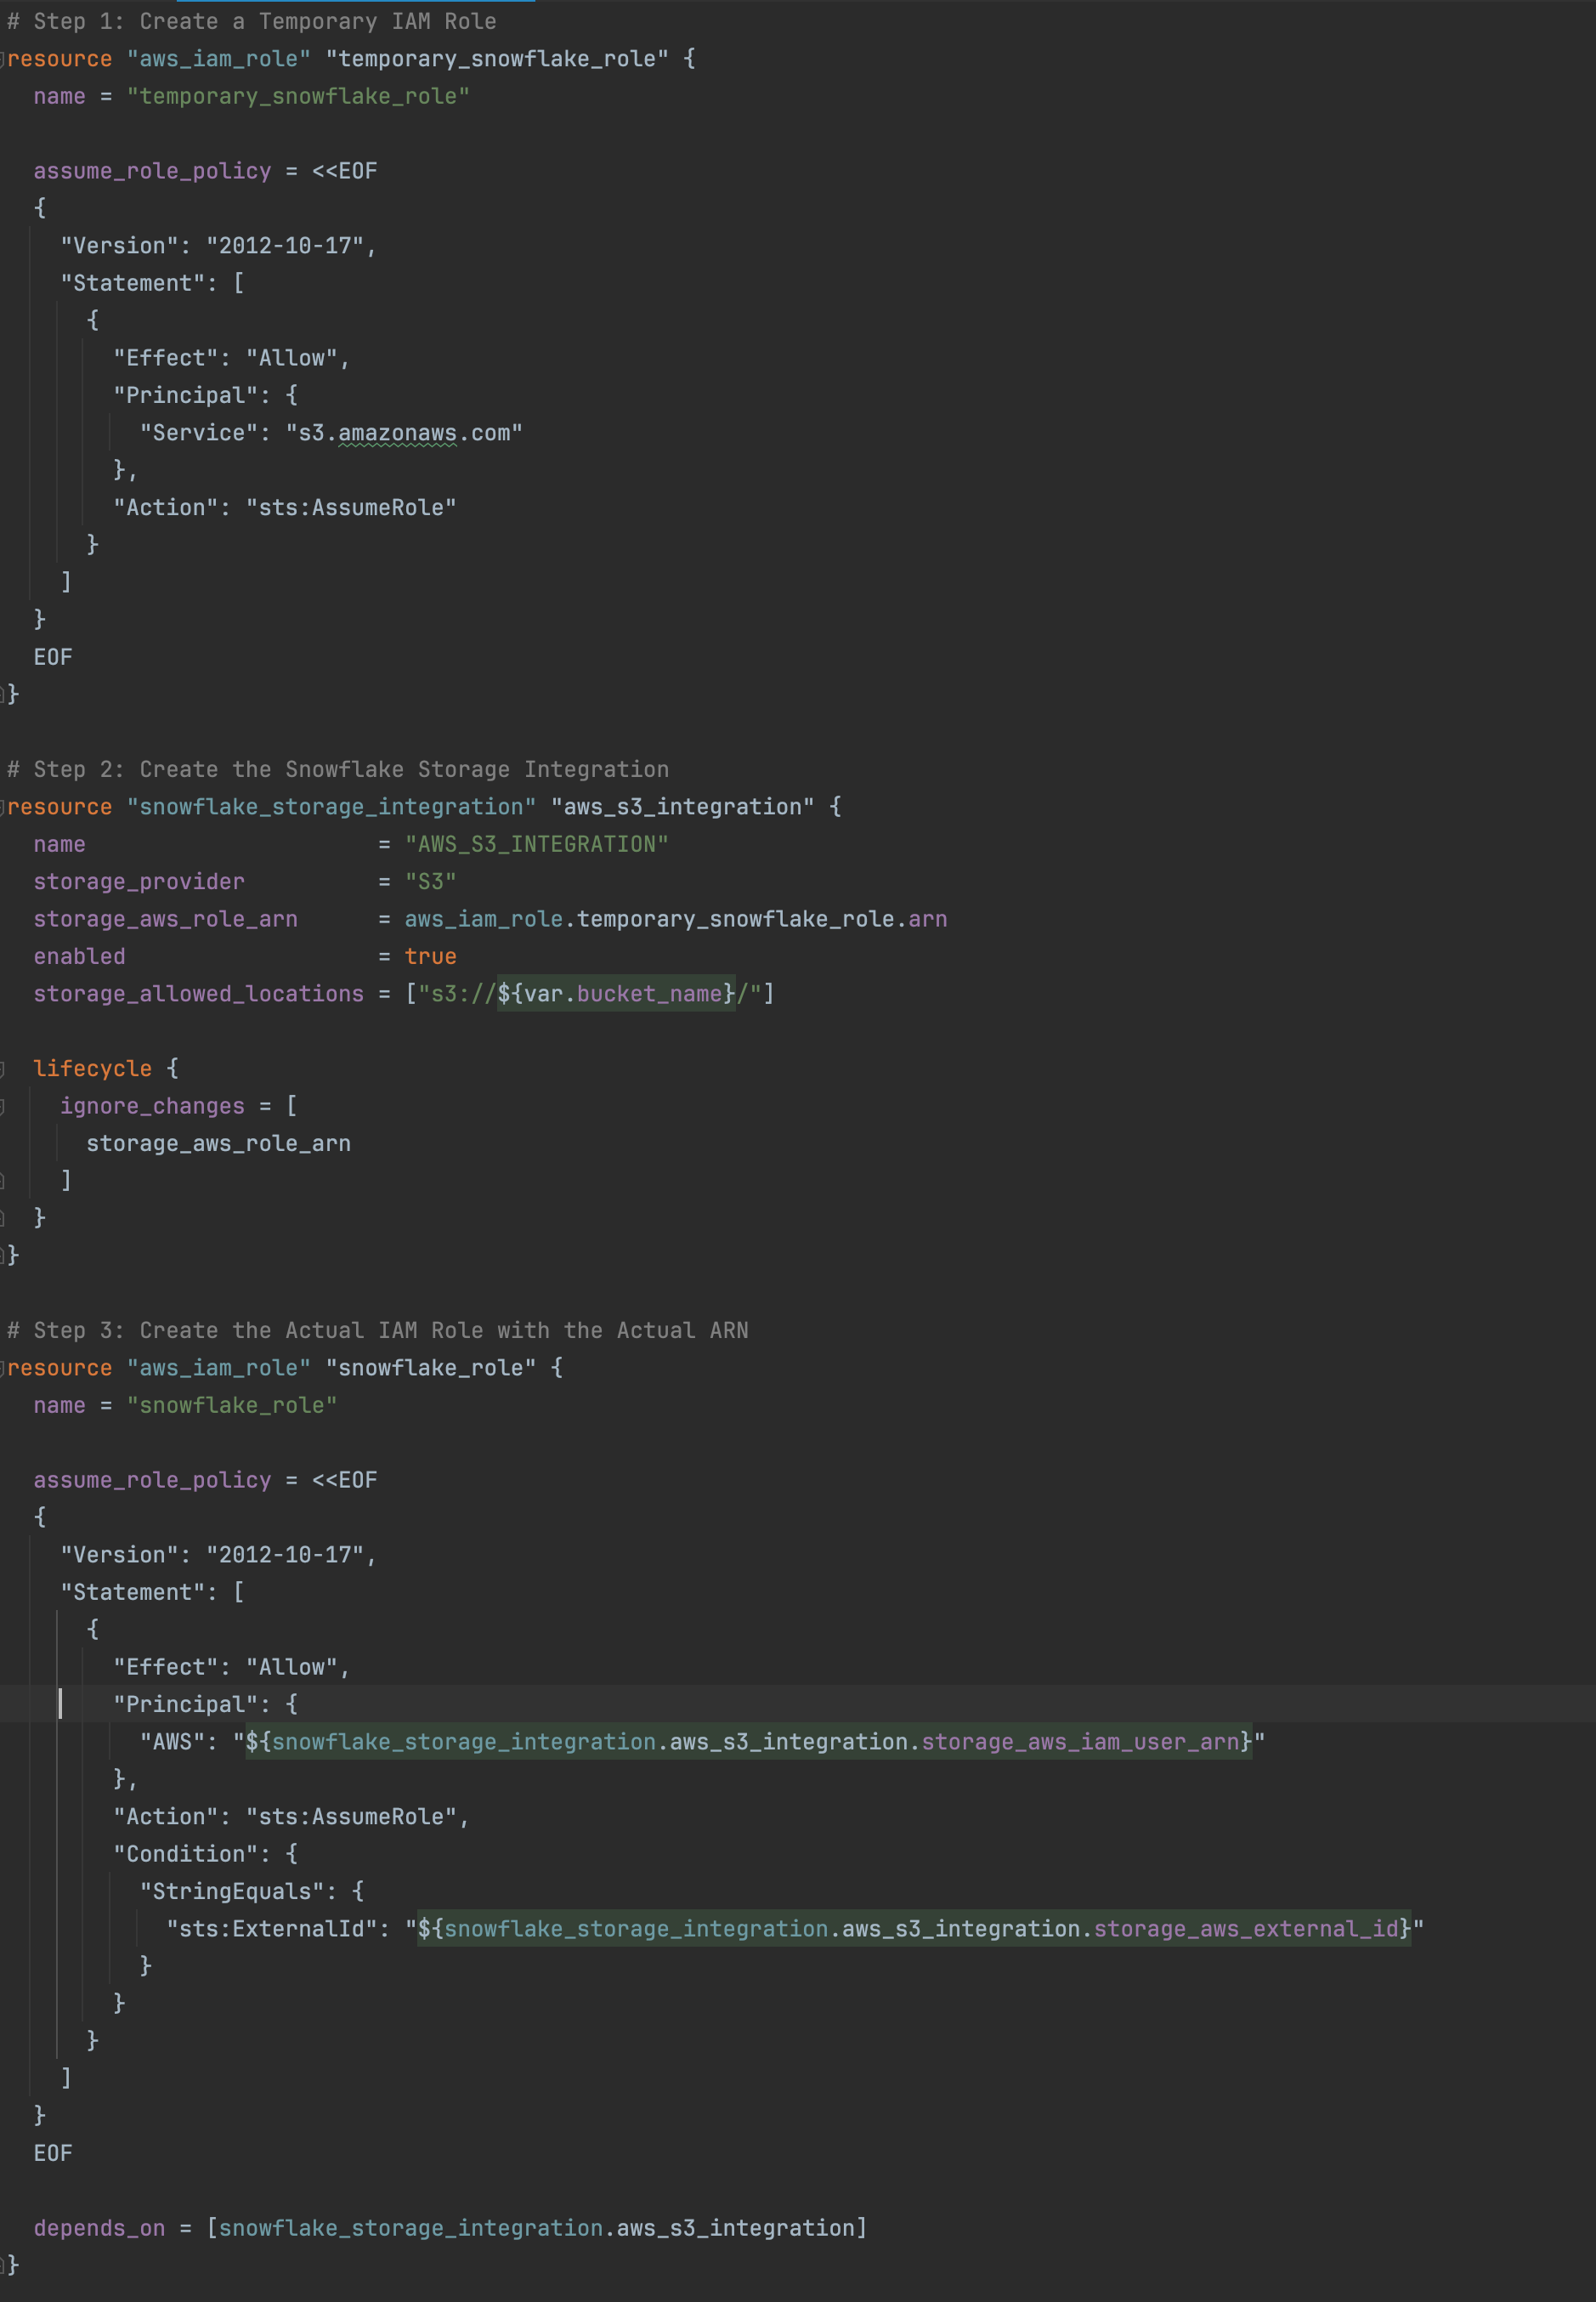
In Snowflake, we need to create an integration which specifies the ARN of the role that we have created in AWS and the S3 location that such integration will read from. When this is created, you can then use the ARN and external id that it provides and put those values in the AWS role.
As you can see, there is a bit of chicken-and-egg situation as the Role needs information from the integration, and the integration needs information from the Role. We will deal with this in Terraform by creating a temporary role, and adding such role’s ARN to the storage integration. We will proceed by creating the storage integration and collecting the data and using such data (IAM_USER_ARN and the External_ID) to create the permanent role. Then we will update the storage integration with the ARN from the permanent role. The full terraform code is in Github here and below you can see the snipped to create what I have just described.
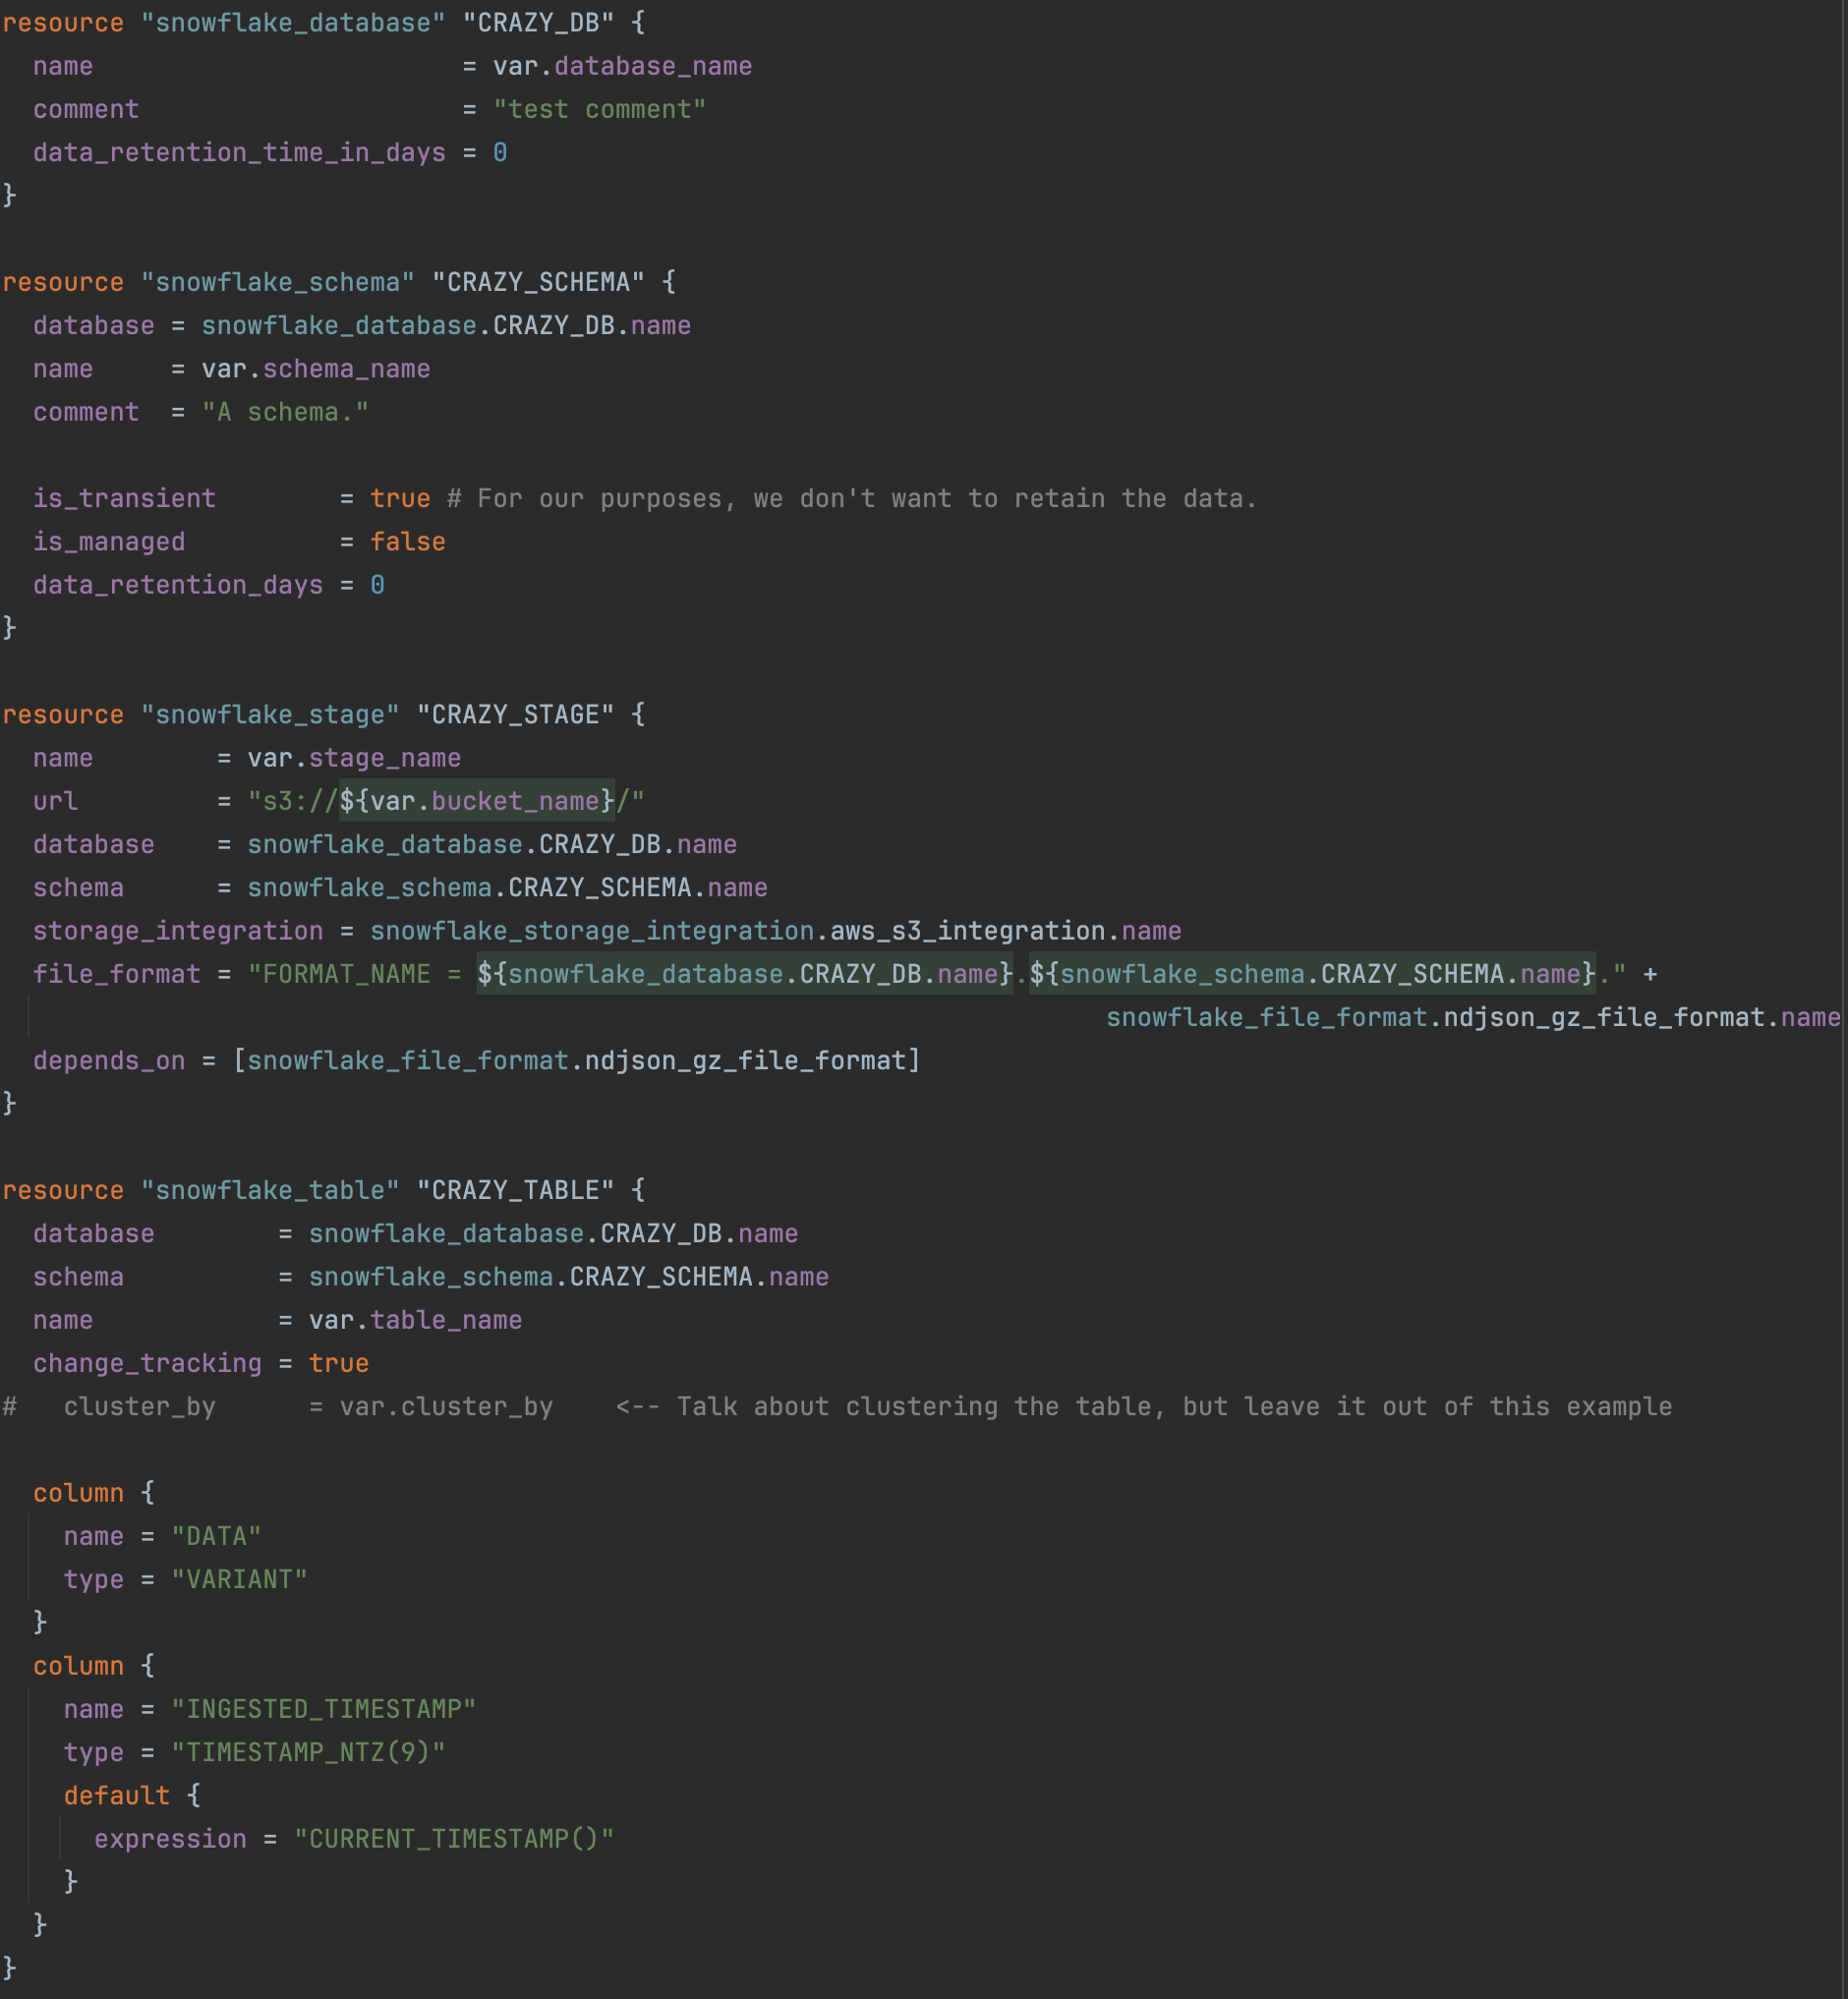
Basic Snowflake Infrastructure
Now that we are connected, we will need a place to store the data that we will be pumping. All data in Snowflake is kept in databases. Each database can have one or multiple schemas. Schemas are logical groups for all your ‘database objects’ such as tables, views, procedures, etc. The schemas play an important part in security as many of the features can be applied at schema level.
The database and schema are straight forward to create and the main thing to choose is the naming (which we all know is the harder part to anything involved in Computer Science).
We also need an external stage, which is another database object stored in a schema. This object stores the URL to files in cloud storage, the settings used to access the cloud storage account, and convenience settings such as the options that describe the format of staged files. The external stage can get credentials in a number of ways, in this case, we will leverage the storage integration that we had created which contains the role and policy to access the S3 files.
Finally, we need a table to store the data that we will be importing from the files. This table will be a simple table, with two fields. One will be for the raw data and one that will capture the ingested timestamp. Here is the terraform to create the infrastructure discussed so far:
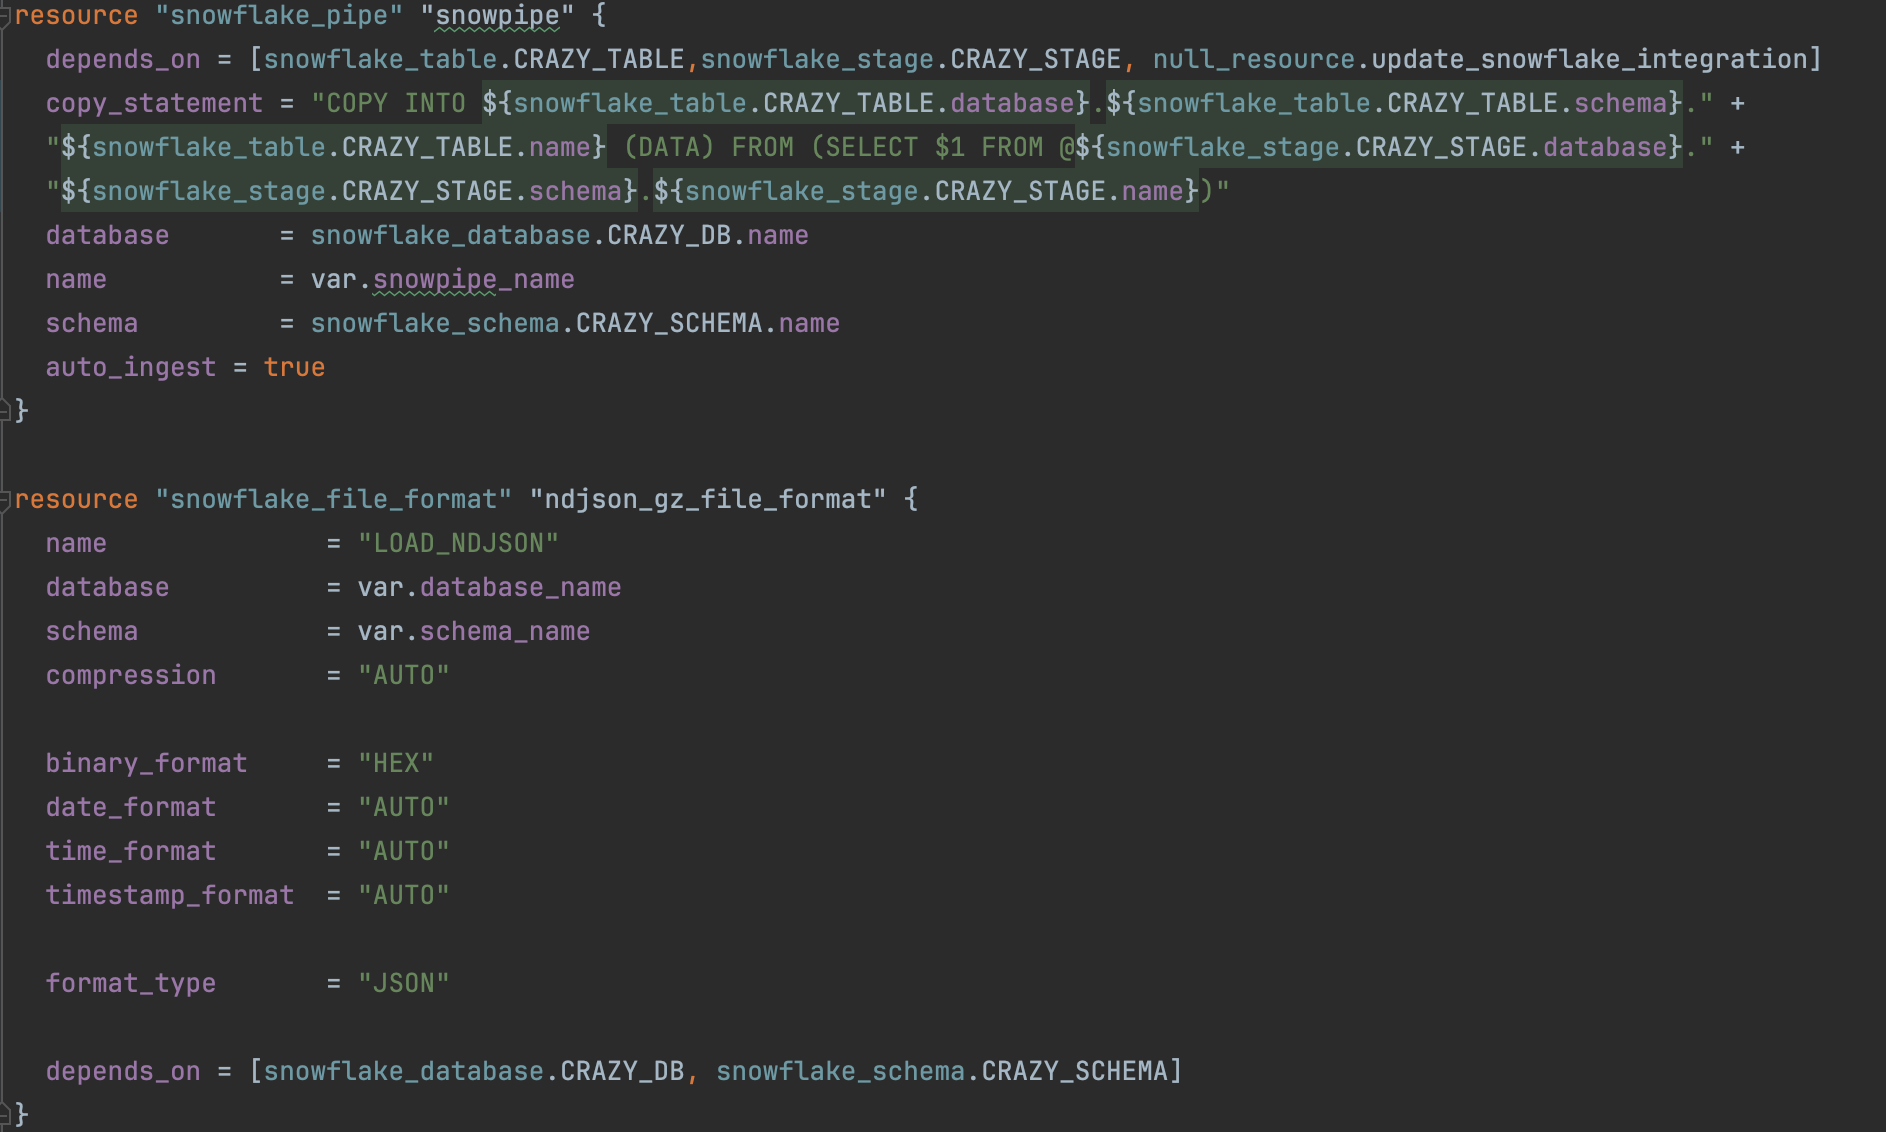
Now that we have our database, schema and table to put the data, we need to actually import the data. Snowflake provides a variety of ways to import data, form running queries using the COPY INTO <table> command, to manually loading via the web interface. For our purposes, I am going to use an automated Snowpipe using cloud messaging, which is a way to automatically detect when files are placed in the source. We will use the COPY INTO command query to read data from the files and add it to our table. Semi-structured data types, such as JSON and Avro, are supported by Snowpipe.
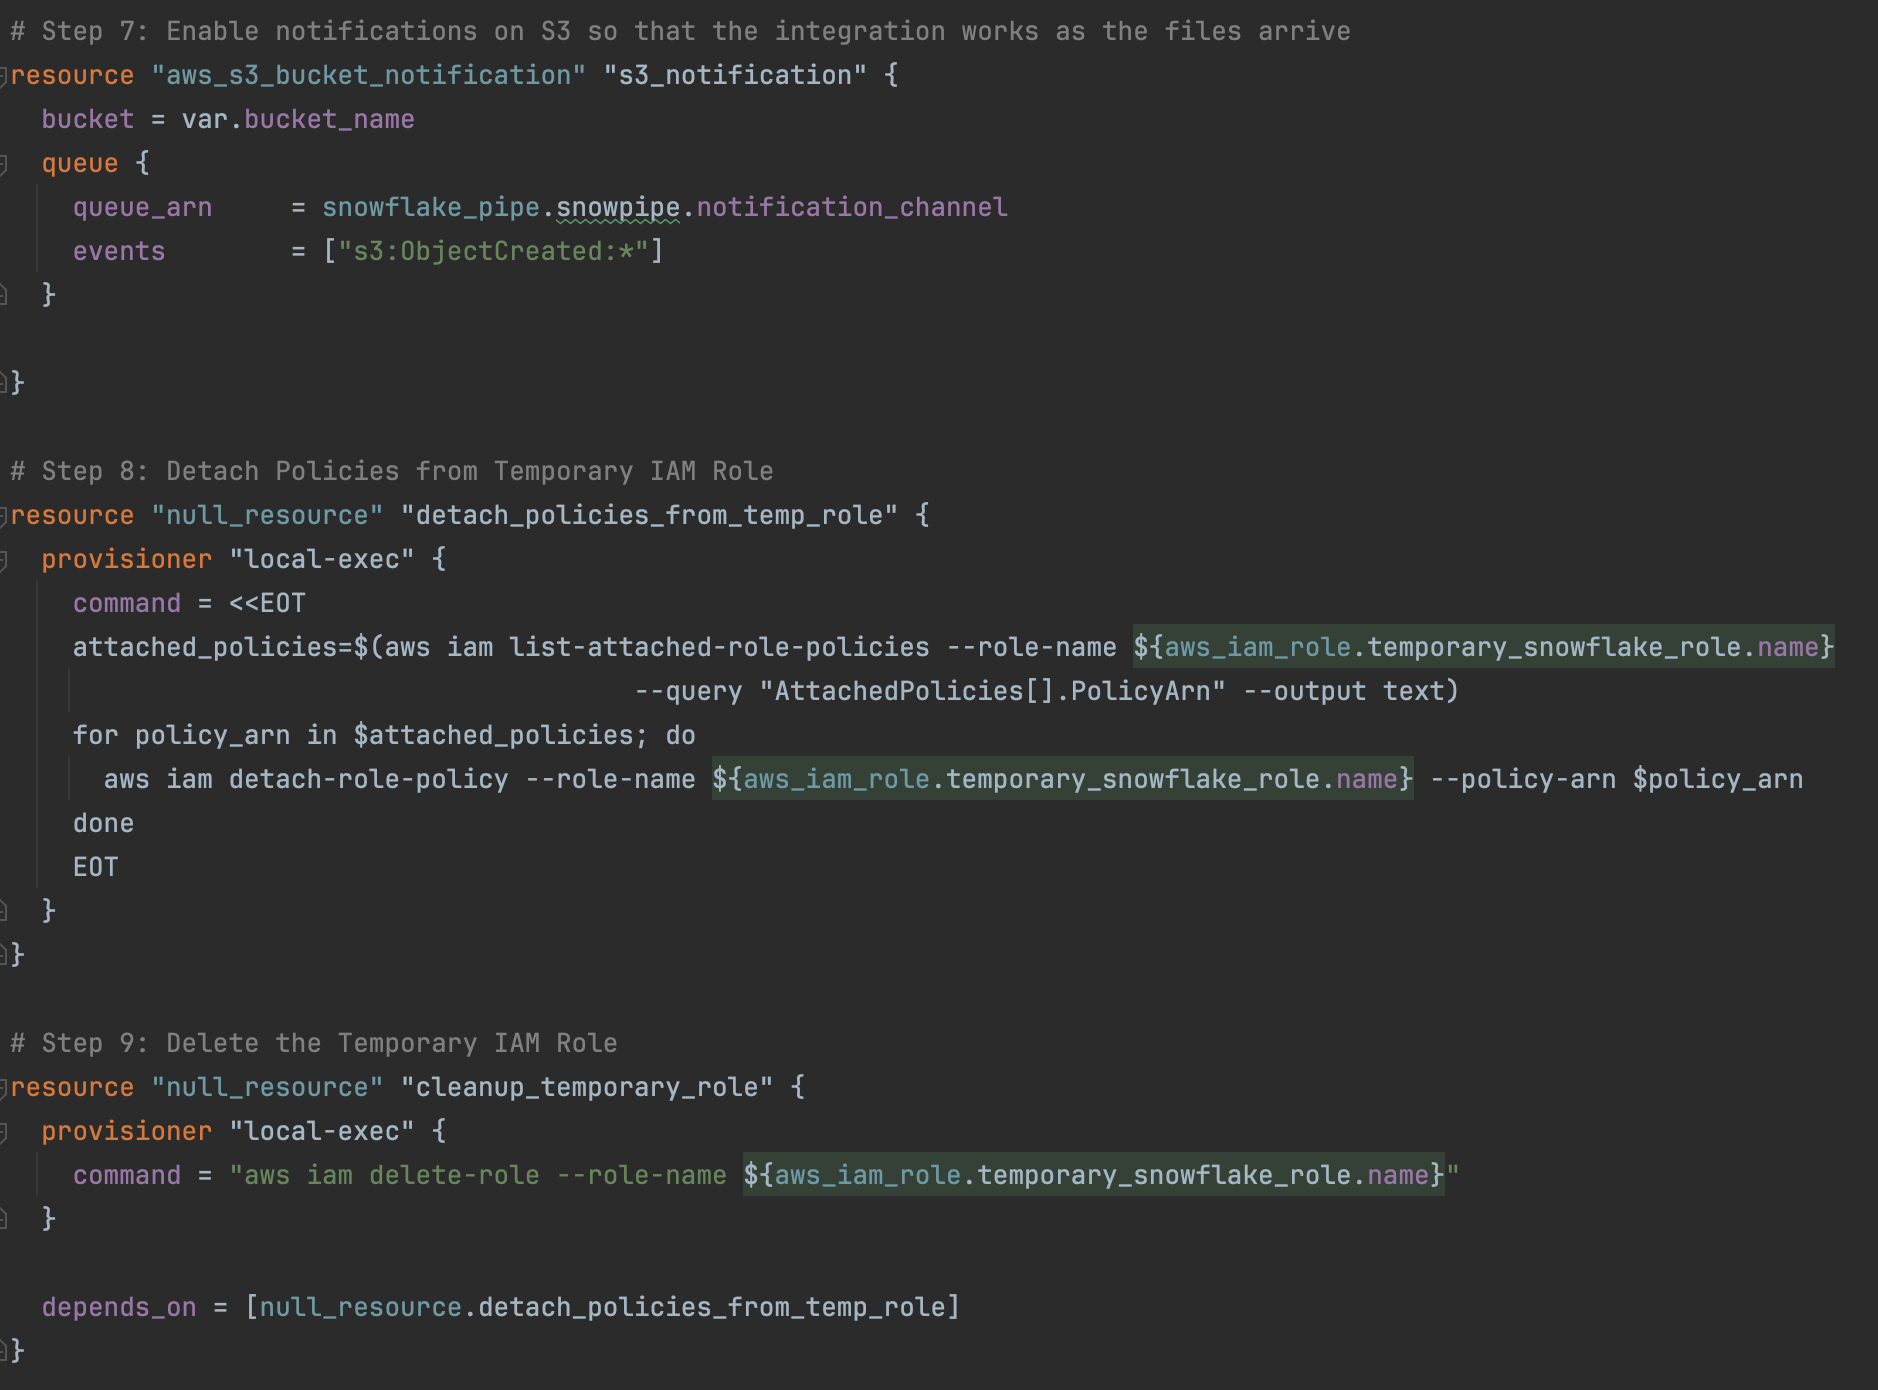
It is important to remember to enable SQS notification in the S3 bucket so that Snowpipe can import the files as they come. Here is the terraform for the Snowpipe and the file format:
Running Terraform
As you know, I am a firm believer on automating everything, so as shown above I went with Terraform to create the infrastructure for this post instead of doing it manually from the console. The Snowflake wiki in medium shows how to do this same process in the console if you are interested in doing it that way. You can find such article here. The full terraform code for this post can be found here. I am assuming that you have Terraform installed in your computer as well as AWS CLI.
Before you can run this terraform script, you will need to install SnowSQL. SnowSQL is a CLI client provided by Snowflake. I used it to update the integration once we get the real role information. You can use this link to install SnowSQL if you don’t have it already. Once that is installed, you can proceed to initialize the Terraform working directory with the command “terraform init”.
Then you should proceed to create the infrastructure by using the “terraform apply” command. That will create all the infrastructure you need to start uploading data. Once this command is successful, you can login to Snowflake and see the data, schema and table are all created. You can also login to AWS and see your policies and S3 bucket SQS notifications.
Uploading a test file
At this point, if we upload a file in the S3 bucket the data should be ingested by the Snowpipe and loaded into our table. This is a sample of the file contents:

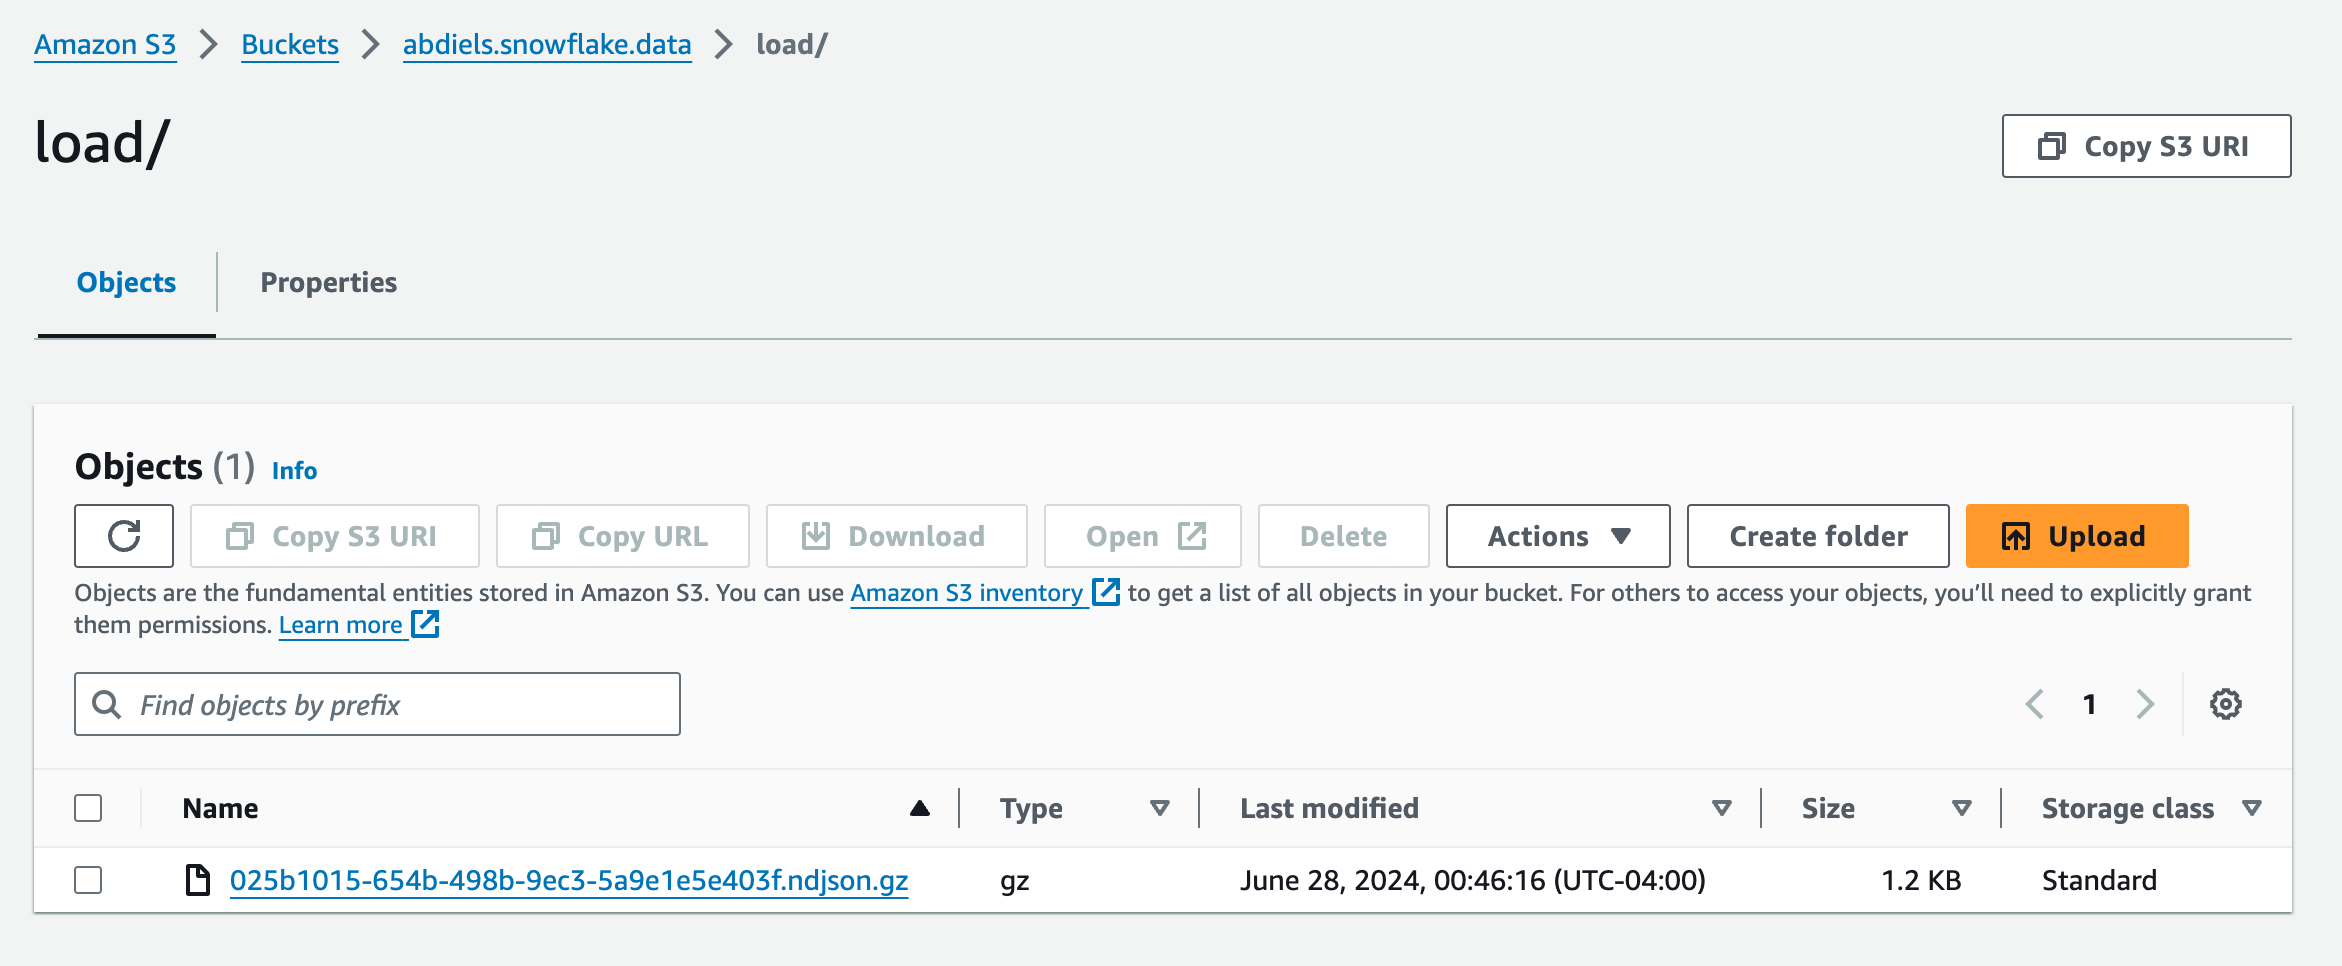
It is a simple NDJson file simulating events with eventId, eventType, eventTime and eventPayload. We are going to upload the compress version of this file into S3.
This is how the S3 looks like:
And this is the table:
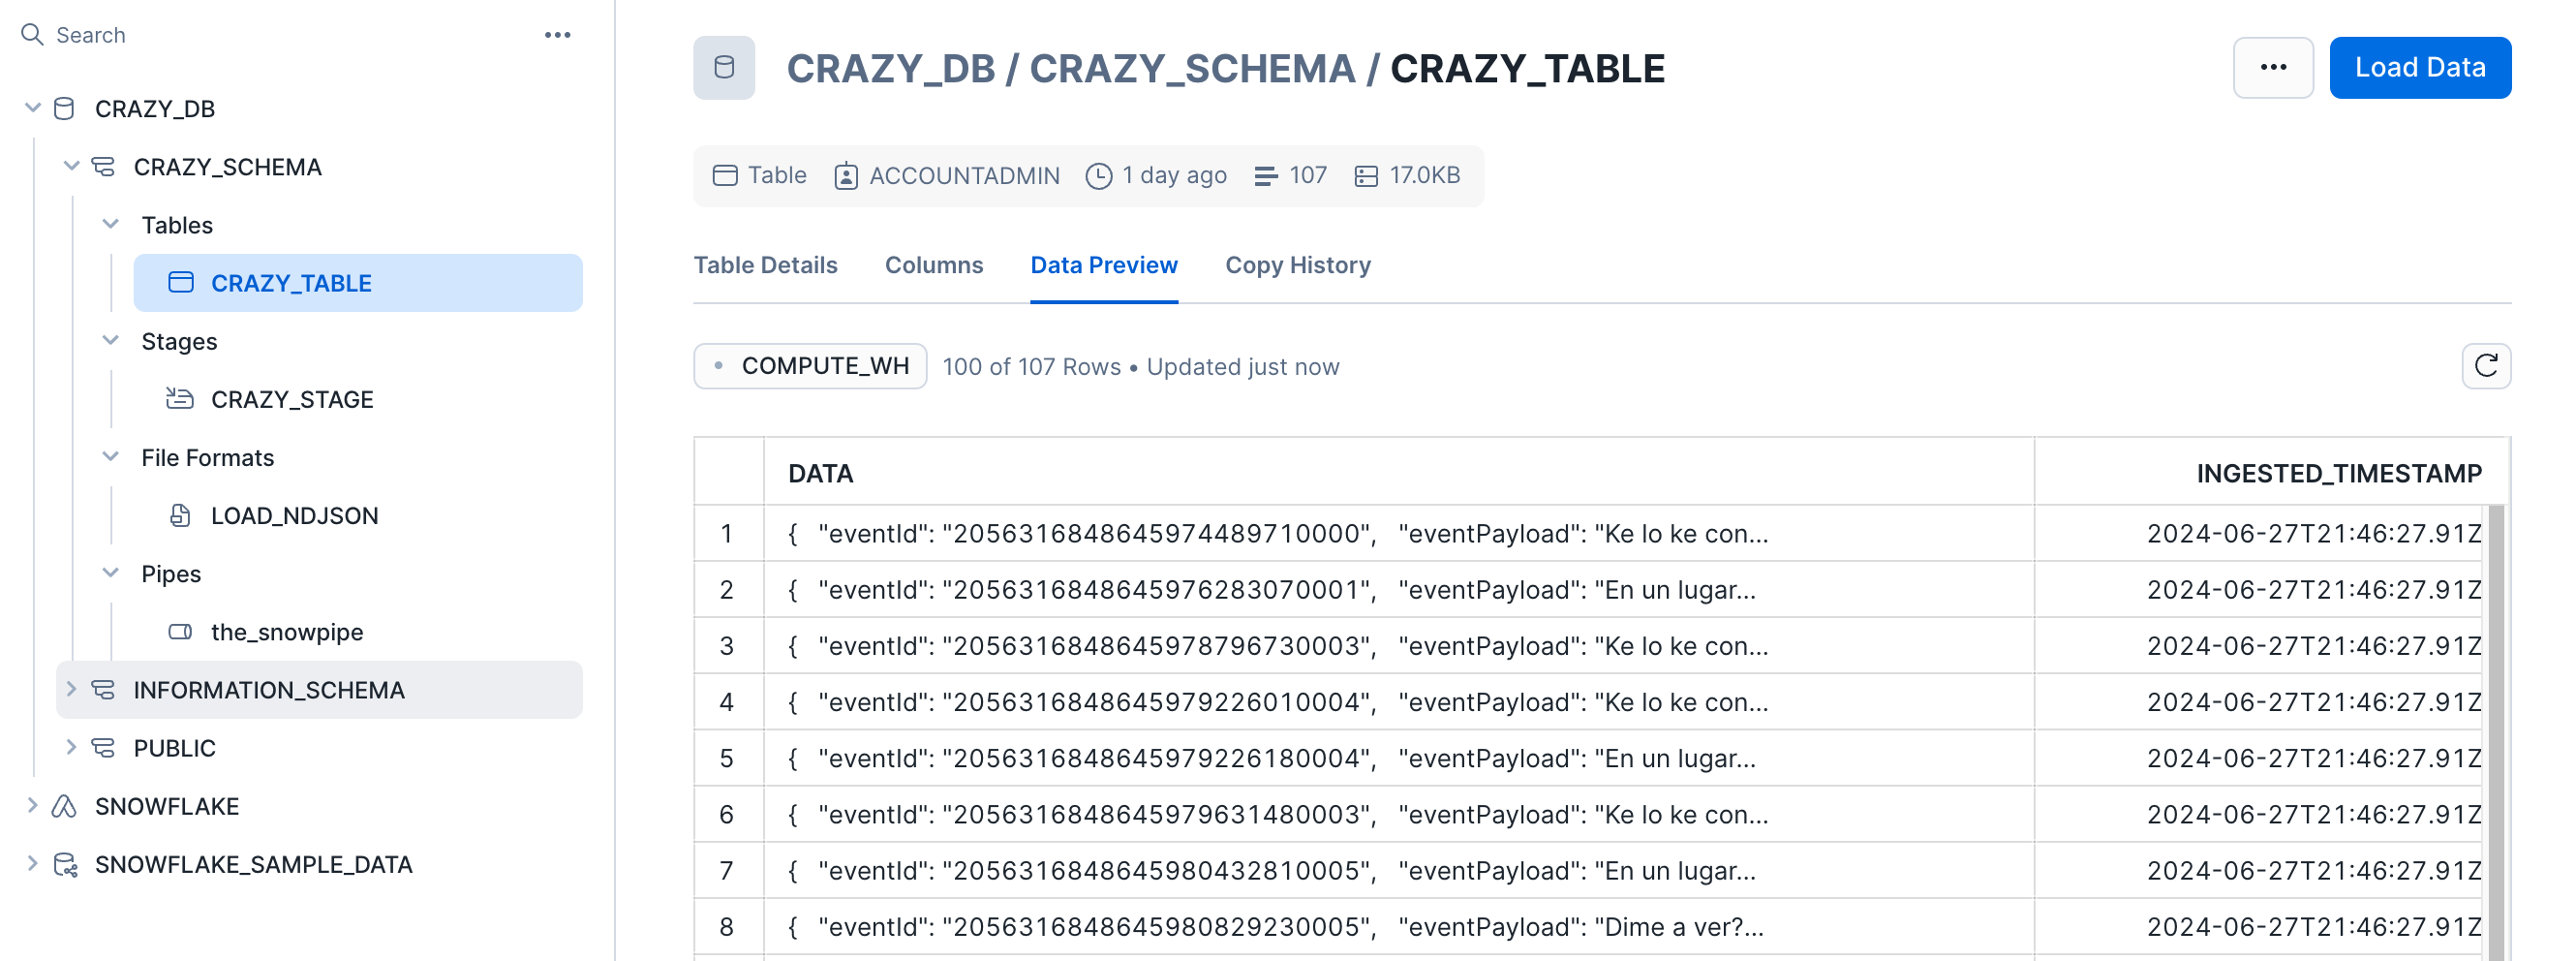
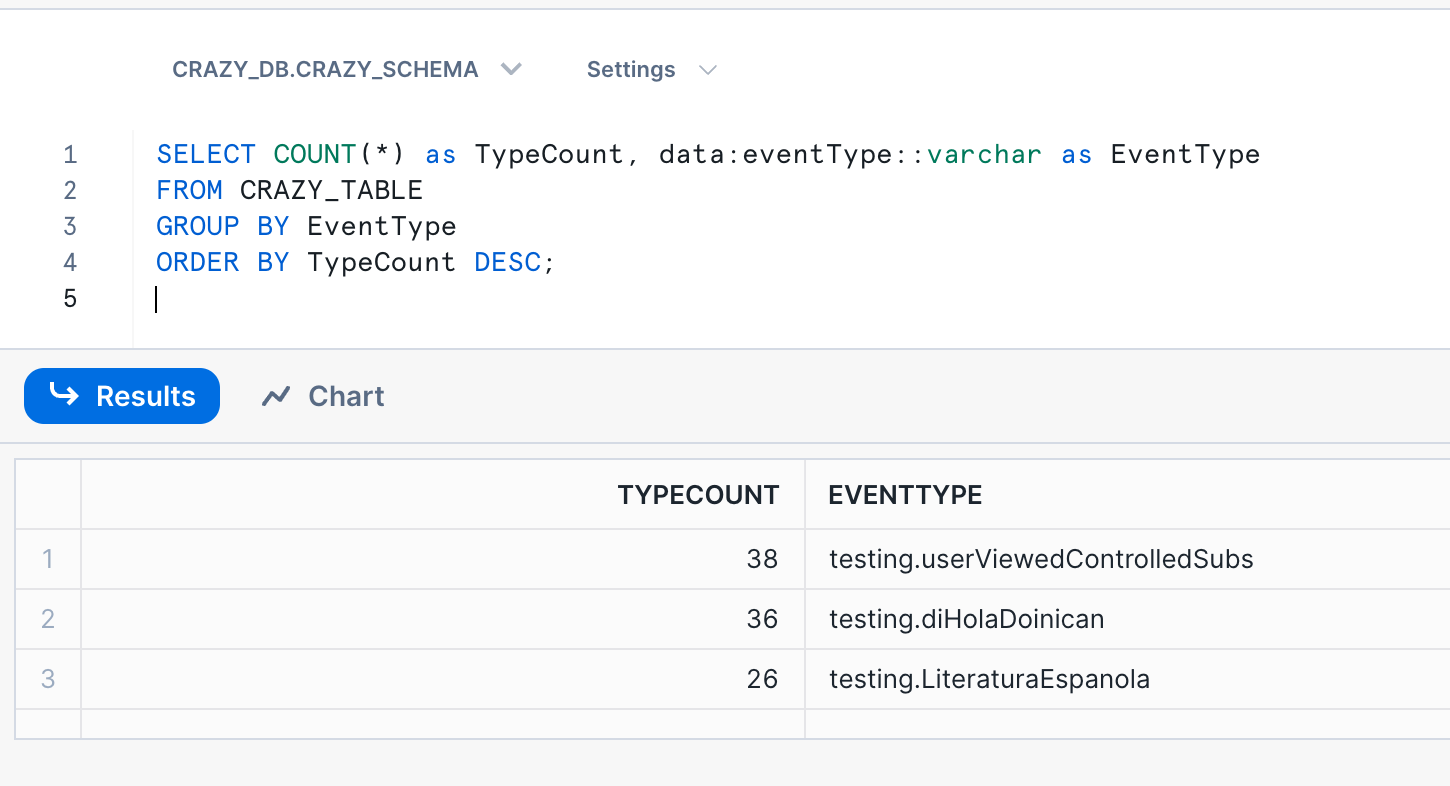
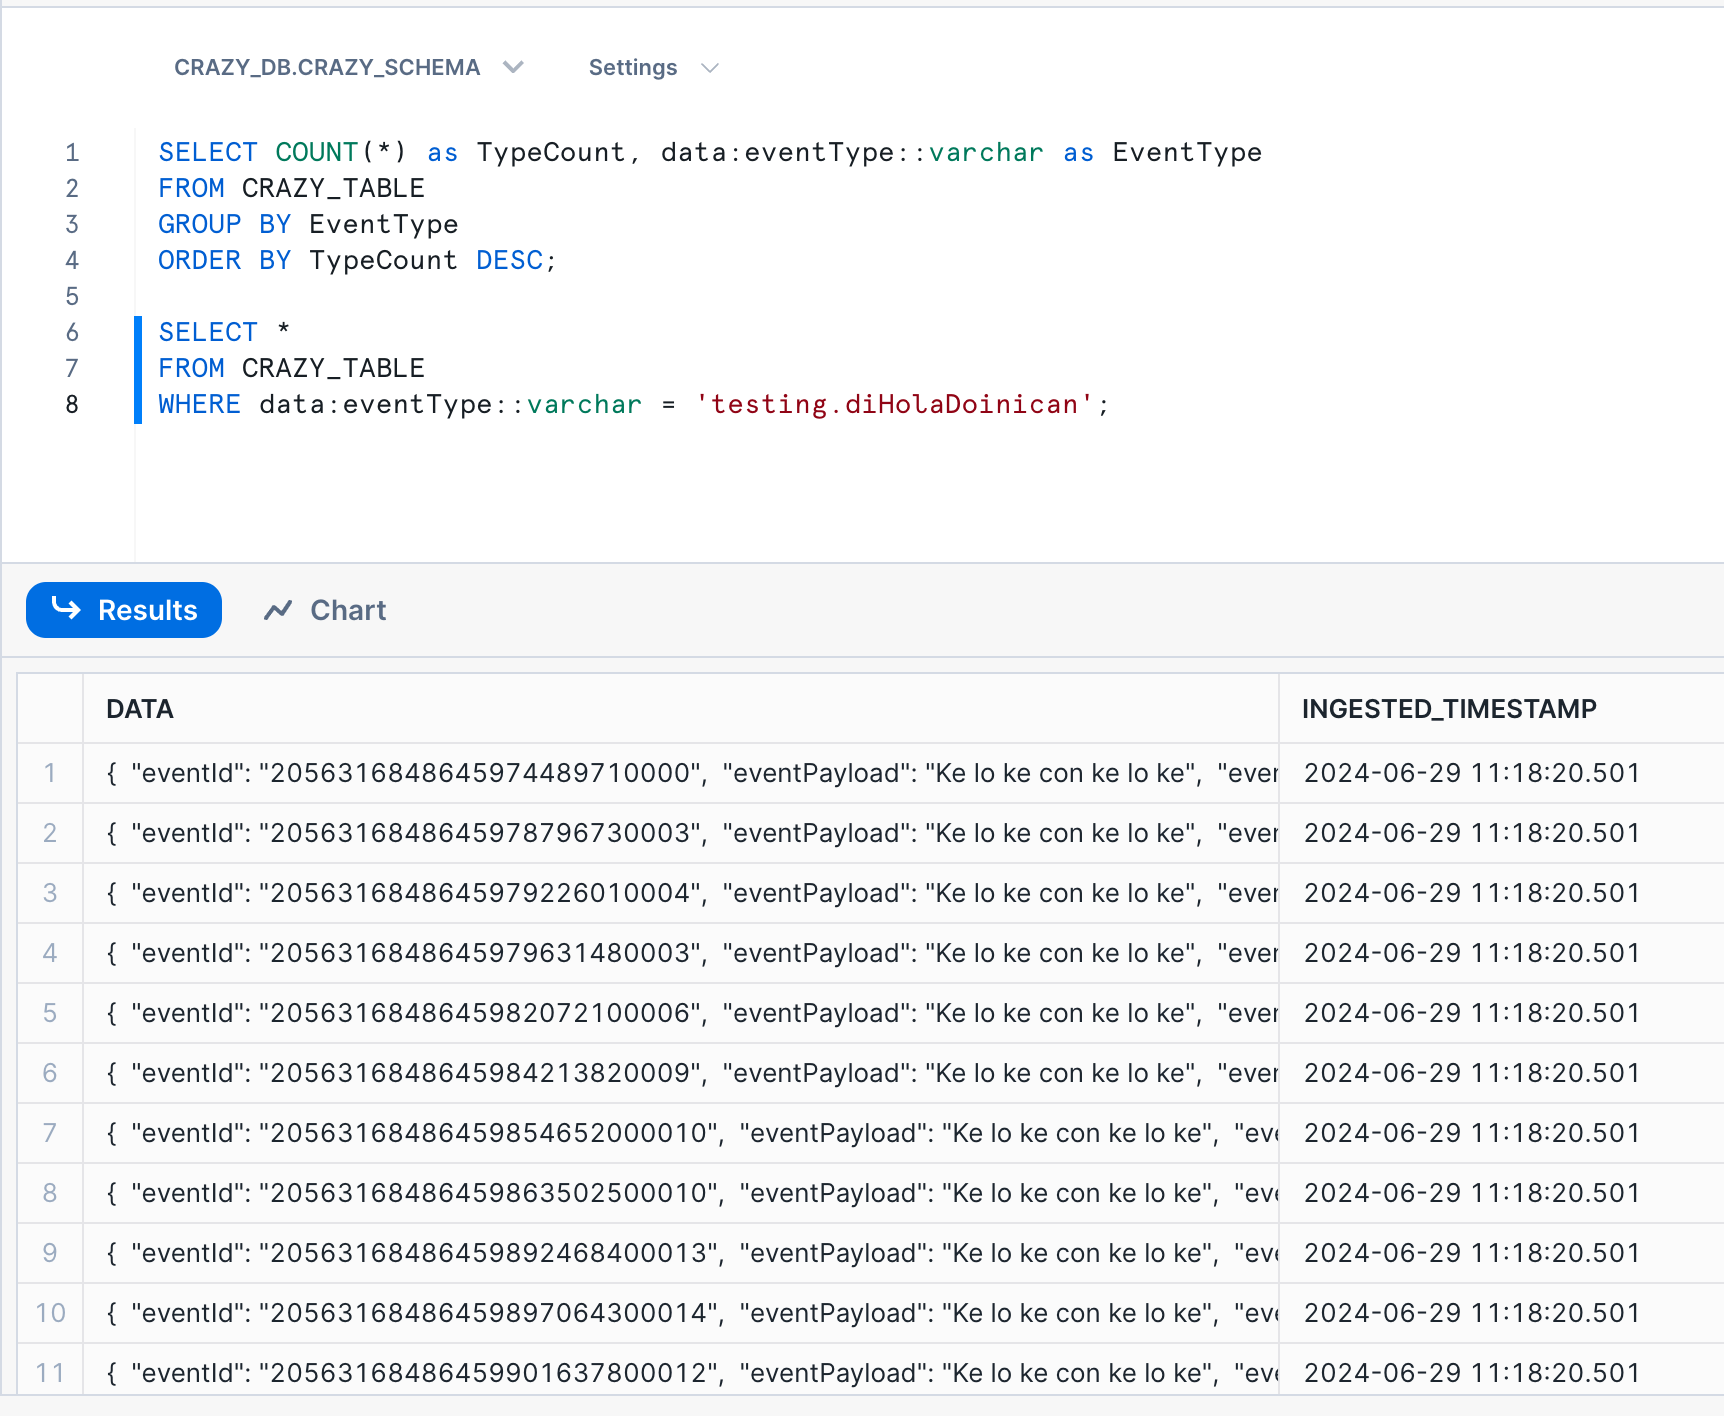
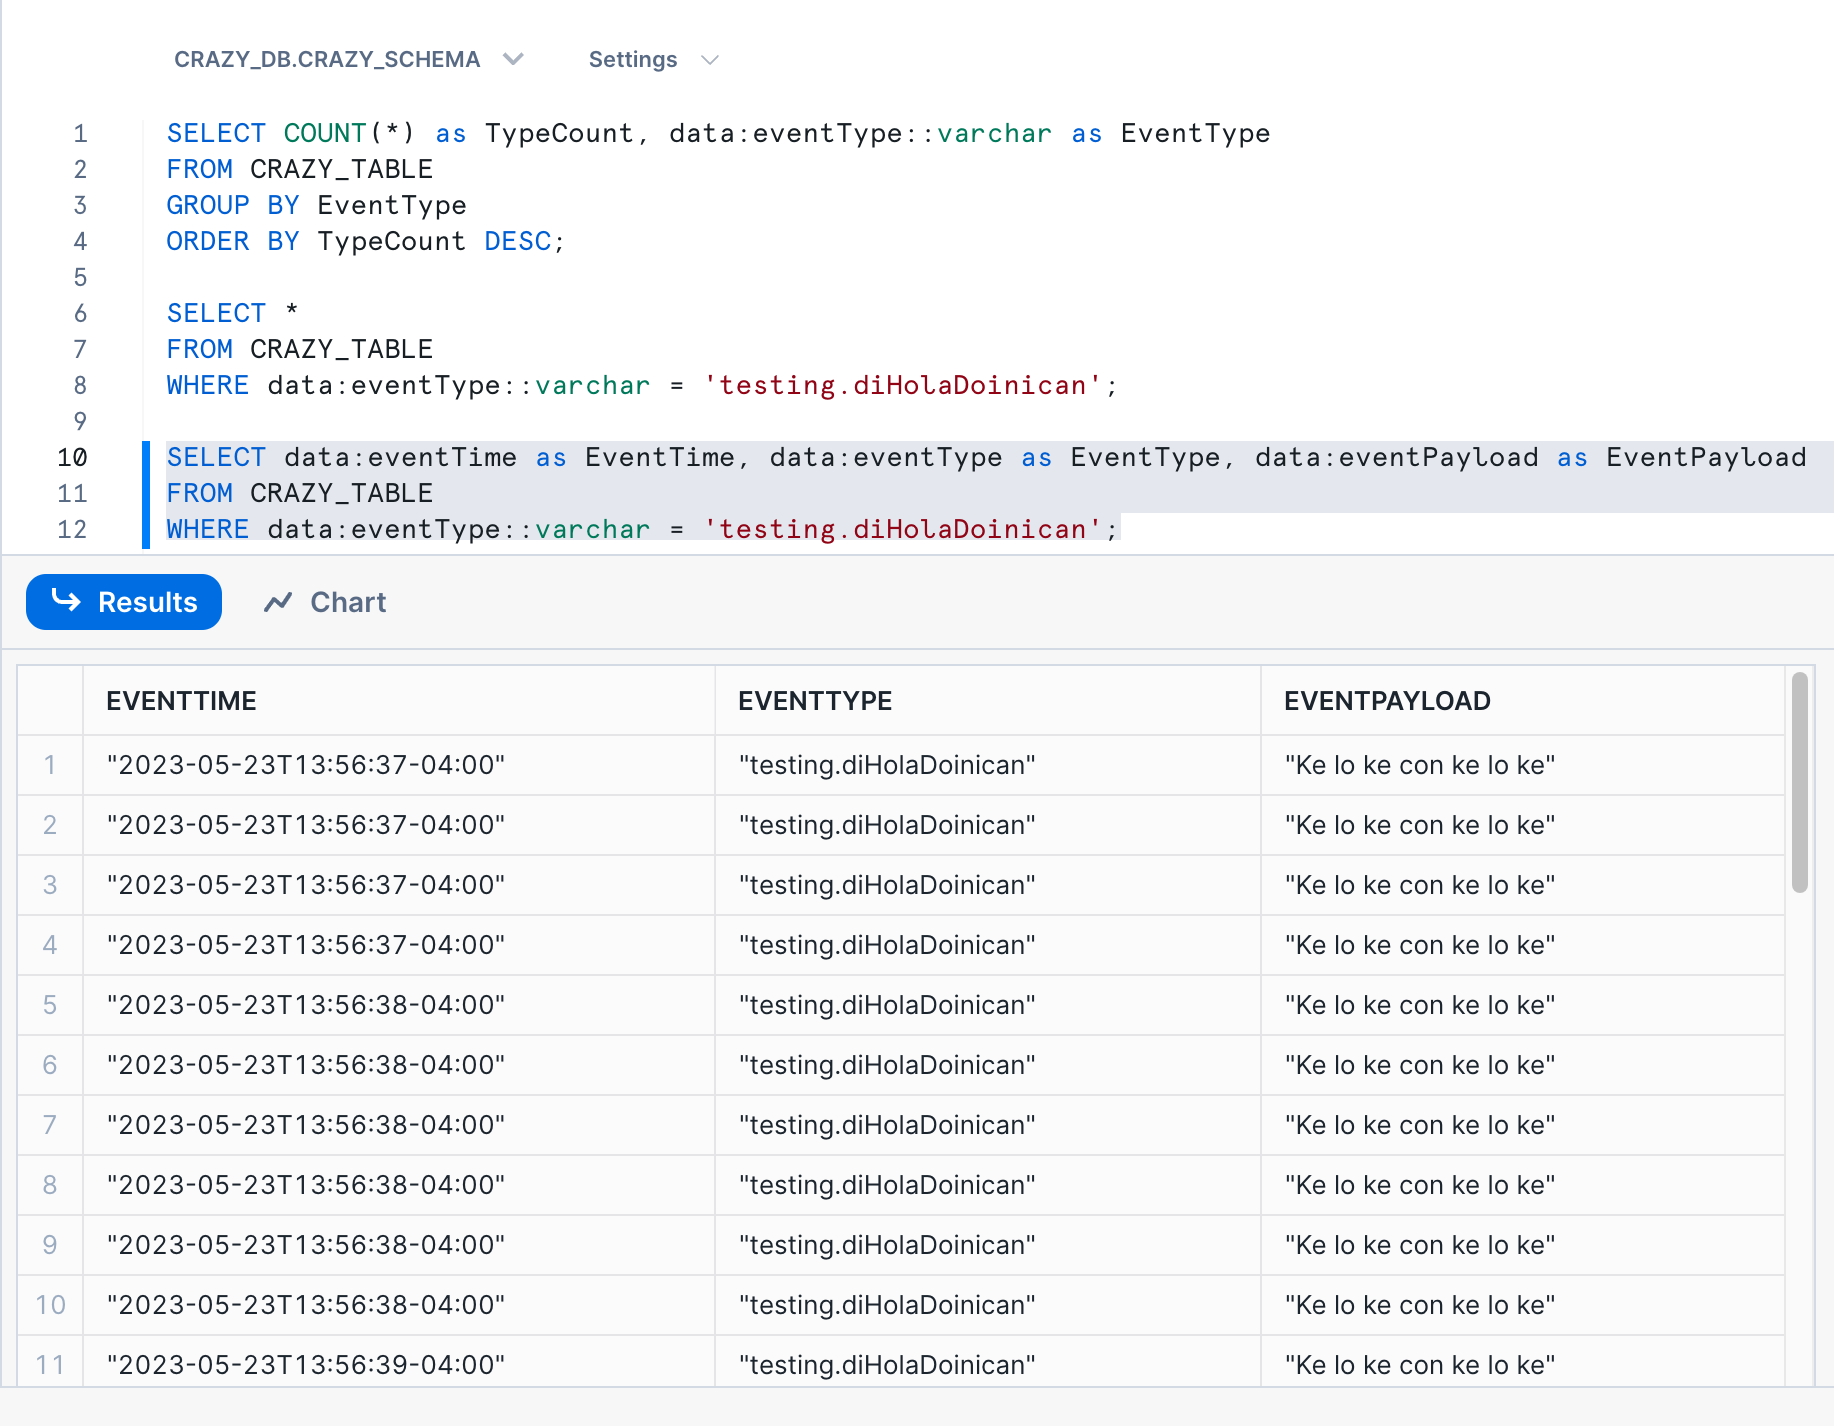
As you can see, the data was loaded into the table. It takes about a minute to ingest the file. In this case, we loaded the full JSON document into a VARIANT field. We can run some queries directly on the JSON data from Snowsight. Here are some sample queries:
Conclusion and Next Steps
The post has taken you from zero to loading data into a Snowflake account, leveraging AWS to load the data and Terraform to create the infrastructure. In this process, we have covered the extract and load steps of the ELT cycle. For the next steps, we’ll dive into the transformation phase, where we’ll create a stream to keep track of new data as it gets ingested by Snowpipe. We will then use a task to periodically import data that has not yet been consumed, based on the changes in the stream. This approach will allow us to write code to transform the data and place it into the desired tables.
This post has demonstrated the seamless integration between Snowflake and AWS, showcasing how these two powerful platforms can work together to provide a robust data management solution. By automating the infrastructure setup with Terraform and using Snowpipe for automated data ingestion, we’ve created a streamlined workflow that enhances efficiency and scalability.
I hope you found this post informative and gained valuable insights into setting up and using Snowflake with AWS. Stay tuned for the next post, where we’ll explore data transformation in more detail. Keep reading, keep learning, and continue leveraging the power of cloud-based data solutions to drive your projects forward!