Introduction
Everything should be automated, and nothing should be done manually more than once. Cloud computing has made it easier to setup complete infrastructure and applications. You can write scripts to create your whole data center with the click of a button. You can stand up anything you need and destroy it the same day. It is now very common, but pretty amazing.
Even if you are simply prototyping you can stand up a separate network with all the necessary subnets and security around it as you wish and then you can setup your machines or your containers to run your applications. Everything should be scripted and automated. This world plays really well with us lazy developers that don’t like to do the same thing twice. Usually, we like the challenge of solving problems over the mundane manually repeated tasks.
AWS provides means to automate infrastructure creation using AWS CloudFormation. This service allows you create infrastructure as code. HashiCorp’s Terraform is a product that allows you create your infrastructure as code; however, it works for any cloud or data center. AWS CloudFormation is specific to AWS.
This post is going to show a set of AWS CloudFormation scripts that will generate a network, a database and an application. I have chosen to stand up a WordPress blog since it was something I was recently looking into recently.
I was inspired by this AWS blog article. The author shows how to setup a WordPress blog using AWS CLI and some CloudFormation. I have taken the same idea but turned it all into full CloudFormation. I implemented the database using Amazon Aurora Serverless instead of the provisioned version. I have also created the same infrastructure and application using Terraform. In order to deploy this WordPress application, we will create network, a database and the actual application. The infrastructure scripts will be organized with these high-level parts in mind. I will briefly touch into what each of those logical divisions will generate.
The complete architecture looks like this:

The Tools
Infrastructure as code (IaC) is the practice of managing and provisioning infrastructure resources through code, rather than a manual process. It enables you to treat infrastructure in a similar way to how you treat software. IaC has become an essential tool, especially when it comes to deploying your applications in the cloud. There are plenty of other IaC and configuration management tools such as Pulumi, Ansible, Chef, Puppet, SalkStack and other cloud specific tools such as Bicep for Azure and Google Cloud Deployment Manager for the Google Could Platform (GCP).
The practice of IaC is what is important, the tool you chose may depend in many factors. Regardless of which tool you decide to use, IaC brings many advantages. By storing infrastructure code in a version control system like Git, you can track changes, collaborate with team members, and manage the history of your infrastructure. This makes it easier to identify and fix issues, roll back to previous versions, and maintain an audit trail of changes. IaC enables you to create consistent and repeatable environments by defining infrastructure resources in code. This reduces the risk of configuration drift and human error, leading to more stable and predictable systems. IaC allows you to easily scale your infrastructure by modifying the code and applying the changes. This makes it easier to adapt to changing requirements, handle increased workloads, and manage resources more efficiently. IaC automates the provisioning and management of infrastructure resources, reducing the time and effort required for manual tasks which enables you to deploy resources faster and focus on higher-value tasks like application development and performance optimization. The code that defines your infrastructure serves as a form of documentation, providing a clear and accurate representation of your system’s architecture. This makes it easier for team members to understand the infrastructure and collaborate on changes. IaC facilitates collaboration between team members by allowing them to review and discuss infrastructure changes through code reviews and pull requests. This helps catch potential issues early, improve the overall quality of your infrastructure, and foster a culture of shared responsibility. IaC encourages the use of reusable modules and templates, which can be shared across different projects or teams. This promotes a modular approach to infrastructure design, reduces duplication, and makes it easier to maintain and update your infrastructure. With IaC, you can better track and manage your infrastructure resources, which can help identify underutilized resources and optimize costs. Furthermore, the ability to quickly spin up and tear down environments means you can minimize the time resources are left unused, further reducing costs.
I have had experience with CloudFormation and Terraform, both are great tools. The first obvious difference is that CloudFormation is designed specifically for managing AWS infrastructure resources. Terraform is a platform agnostic tool that supports multiple cloud providers, including AWS, Google Cloud Platform (GCP), Microsoft Azure and others. This makes Terraform more versatile option for managing infrastructure across different cloud providers. Keep in mind that code used for different cloud providers will be specific to such providers and not reusable in others. However, if your staff is good with Terraform, then they can manage a multi-cloud setup with the same tool. That brings me to my next point, the language and syntax used by each tool. CloudFormation uses JSON or YAML, I prefer YAML as it is less verbose, but the same things can be accomplished with either one. Terraform uses its own language called HashiCorp Configuration Language (HCL) which was designed specifically for describing infrastructure resources. HCL kind of combines JSON and YAML making it easy to read and write if you are familiar with those languages.
Another important thing to talk about is state management, meaning how does each tool manages the state of the infrastructure you have created. In the case of CloudFormation, AWS manages the state for you, there is no need for you to worry about where the state is kept. One less thing to worry about, except you are reliant on AWS for managing the state. Terraform maintains a state file that keeps track of your infrastructure resources, allowing you to easily compare the desired state with the actual state. This state file can be kept in your own machine or in a shared location such as S3 where Terraform offers features that allow a team’s collaboration by providing locking of the file using a DynamoDB table.
Like any other tool one is looking into, it is important to consider the community and ecosystem behind them as well as the learning curve for one’s team to learn and implement such tool. CloudFormation, being an AWS service has all the support from AWS and its community. It comes with a large number of pre-built templates for AWS services, and it is likely that new AWS services will have CloudFormation support faster than any other tool. This is a great asset to simplify the provisioning process. Terraform has a big growing community that contributes to its open-source codebase and creates reusable modules. The Terraform Registry contains many modules and providers that can be used for different cloud platforms and services, making it easy to find and reuse code. Regarding the learning curve, if you are familiar with AWS services, learning CloudFormation might be easier since it uses native AWS concept and syntax. Terraform has a more generic approach, and learning HCL might take some time. However, once you have learned HCL, you can use it across different cloud platforms. Both are well documented and after understanding certain key concepts, they are easy to pick up and use.
The Network
The previous architecture diagram describes a Amazon Virtual Private Cloud (Amazon VPC) instantiated on an AWS region. The VPC contains four subnets, two of each on different Availibity Zones. In production or even prototyping, there is no need to create the network for each application. There might be reasons that one may want to keep different VPCs within the account. I don’t intend to go into VPC design or AWS account organization, but rather show an example where everything is created. I am also not going to cover most of the reasons for the architectural decisions on the present architecture. Each AZ (Availability Zone) contains two subnets, one public and one private. The architecture uses an Internet Gateway to allow internet access to the VPC’s public subnets. A NAT Gateway allows access to the application in the private subnets. There are other network architecture intricacies that can be found in the scripts such as a Route Tables, Network ACLs, etc. that are not in the diagram, but can be found in the corresponding scripts as parts of the architecture.
The network layer is also defining the shared file system. It can be debated if the shared files system is part of the “network”, but in this case, it was better for me to just include it as part of the network infrastructure. An EFS (Amazon Elastic File System) is used a persistent storage for the WordPress application. The EFS is exposed to the application via EFS Access points.
The Database
For this application, I decided to use an Aurora Serverless RDS database. This will allow to save on cost as AWS will only charge for time used rather than 24/7 for the database compute resources. The blog does not require fully allocated database resources, so this is a good use of the serverless model. The database infrastructure module will also create Security Group for the database.
The Application
An Application Load Balancer (ALB) exposes the application to the outside via the Internet Gateway, leveraging the NAT Gateway as well for security. The application has a Security Group in order to expose only the needed port. In this case we are using the unsecure HTTP connection exposing port 80. The ALB will map that port 80 into its Target Group port 8080 which the Security Group of the ECS application exposes. The application itself runs in a Docker Container using AWS Faregate running on Amazon Elastic Container Service (ECS).
The code
The code for this project can be found here on GitHub. The code has two folders, one for a CloudFormation implementation and another for a Terraform implementation. It is meant to create the infrastructure discussed above and install a WordPress application. You will need to point it to your AWS credentials.
CloudFormation Templates
Let’s go over how to run the CloudFormation of the code and how to run it. I have selected to use YAML for this example instead of JSON. Here is a YAML of CloudForamtion snippet:
Resources:
  MyBucket:
    Type: 'AWS::S3::Bucket'
This snippet is not in the code, but rather meant as an example to shoe the CloudFormation syntax with a recognizable resource such as S3. In this example, “Resources” is a section in the template where we define our AWS resources. “MyBucket” is the logical ID of the resource we’re creating. Type specifies the type of resource we’re creating, in this case, an S3 bucket.
After defining your infrastructure in a CloudFormation template, you then create a CloudFormation stack. A stack is essentially a collection of AWS resources that you create and manage as a single unit. All the resources in a stack are defined by the stack’s CloudFormation template. Parameters in a CloudFormation template allow you to input custom values to your template each time you create or update a stack. They make your template code reusable because you can keep resource configurations in your template generic, then customize each stack creation with different parameter input values. Outputs are optional values that you can include in a CloudFormation template to return information about the resources in your stack. For example, the Amazon Resource Name (ARN) or DNS name of a created resource. This is a snippet from the code provided:
Resources:
  NetworkStack:
    Type: AWS::CloudFormation::Stack
    Properties:
      TemplateURL: https://<my_bucket>/cf-templates/wordpress-network.yaml
      Parameters:
        VPCName: "WordpressBlogVPC"

  DatabaseStack:
    Type: AWS::CloudFormation::Stack
    Properties:
      TemplateURL: https://<my_bucket>/cf-templates/wordpress-db.yaml
      Parameters:
        VpcId: !GetAtt NetworkStack.Outputs.VPCId
        DBSubnetGroupName: !GetAtt NetworkStack.Outputs.DBSubnetGroup
Here we are creating two reources of type stack, these are netsted stacks. The stacks get created based on the resources defined in the provided templates which are hosted in S3. Notice the parameters, those are the inputs required for such templates. It is also important to highlight that in the parameters for the DatabaseStack, we are using the Outputs of the NetworkStack. CloudFormation also uses Mappings which allow you to map keys to a set of corresponding values, which can be used to conditionally create resources based on the input to the template. Here is a snipped of the provided code in the wordpress-network.yaml:
  Mappings:
    SubnetConfig:
      VPC:
        CIDR: "10.0.0.0/16"
      Public0:
        CIDR: "10.0.0.0/24"
      Public1:
        CIDR: "10.0.1.0/24"
      Private0:
        CIDR: "10.0.2.0/24"
      Private1:
        CIDR: "10.0.3.0/24"
These mappings are later use in the same file like this:
    PublicSubnet0:
      Type: "AWS::EC2::Subnet"
      Properties:
        VpcId:
          Ref: "VPC"
        AvailabilityZone:
          <!-- Other code -->
        CidrBlock:
          Fn::FindInMap:
            - "SubnetConfig"
            - "Public0"
            - "CIDR"
There are other constructs that you should investigate such as Conditions and Transform, although I did not use those in this example, they are worth mentioning. In order to find template reference and many other information that will help build your own CloudFormation templates please refer to the AWS CloudFormation user guide. Now, let’s focus on how to run the CloudFormation Templates. Although CloudFormation does support CLI, the templates have to be in S3 anyway so might as well go to the console to run it. This page has the AWS documentation for working with stacks. It covers logging in to the AWS console which is the first step. Then go to the CloudFormation service and select create stack with new resources. This will take you to a page that looks like this:

You can play with the designer (the button will be enabled as soon as you put in the S3 URL), but for our purposes here, just click next. In the next page, you will be asked for the stack name. Go ahead and give the stack a meaningful name. I will name it “WordpressApplicationStack”. We don’t need to provide any parameters the way these templates are setup. In the next page, you have the option to add tags, permissions, stack failure options and other advanced options. Just click next and stick the defaults. The next page gives you an opportunity to review your choices. Accept the acknowledgements at the end of the page and press submit. This will start the stack creation and you will see a page like this:
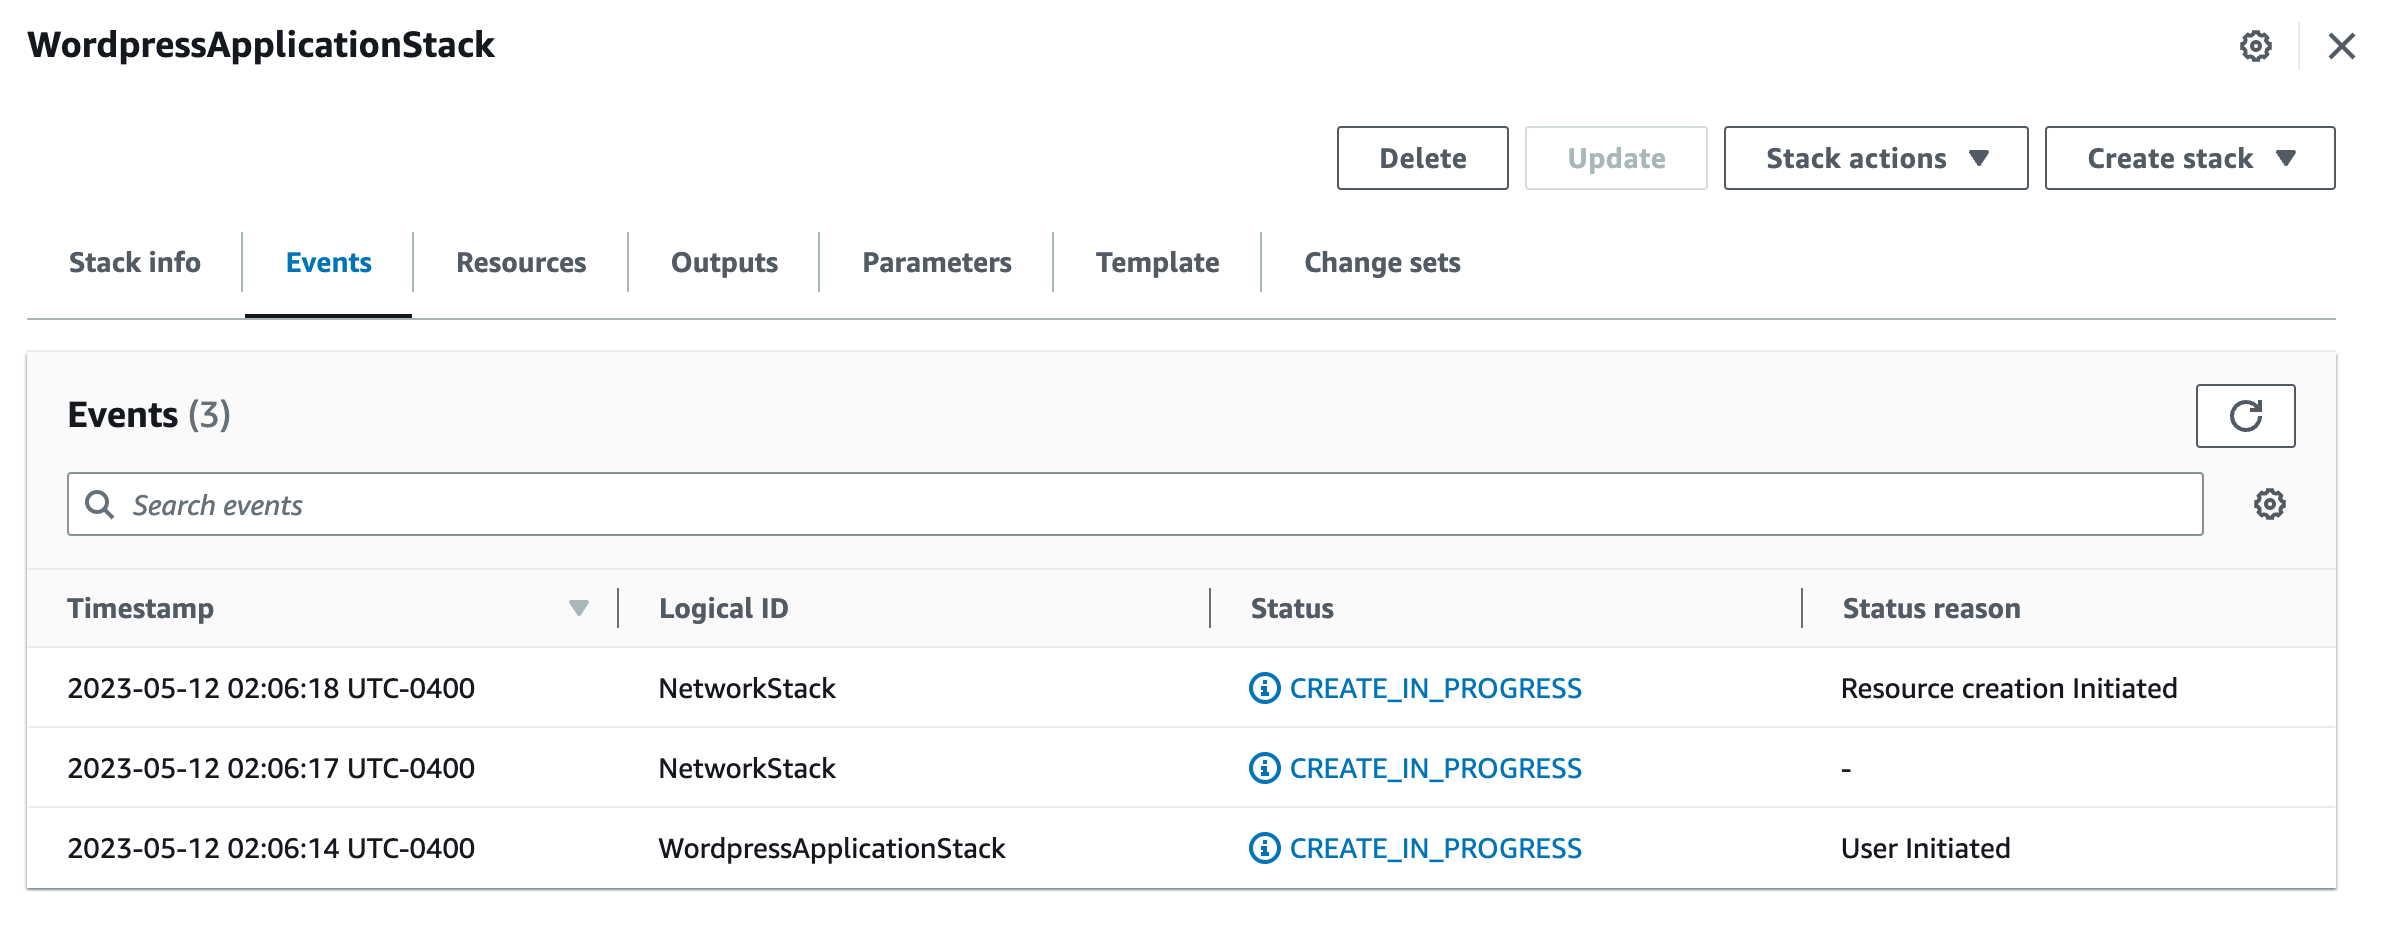
This page has multiple taps, each of which shows you what is going on with the creation of the stacks. You can go to the resources page, for example, where you will see all the different resources being created. On the left you can see the nested stacks. Here is an example:
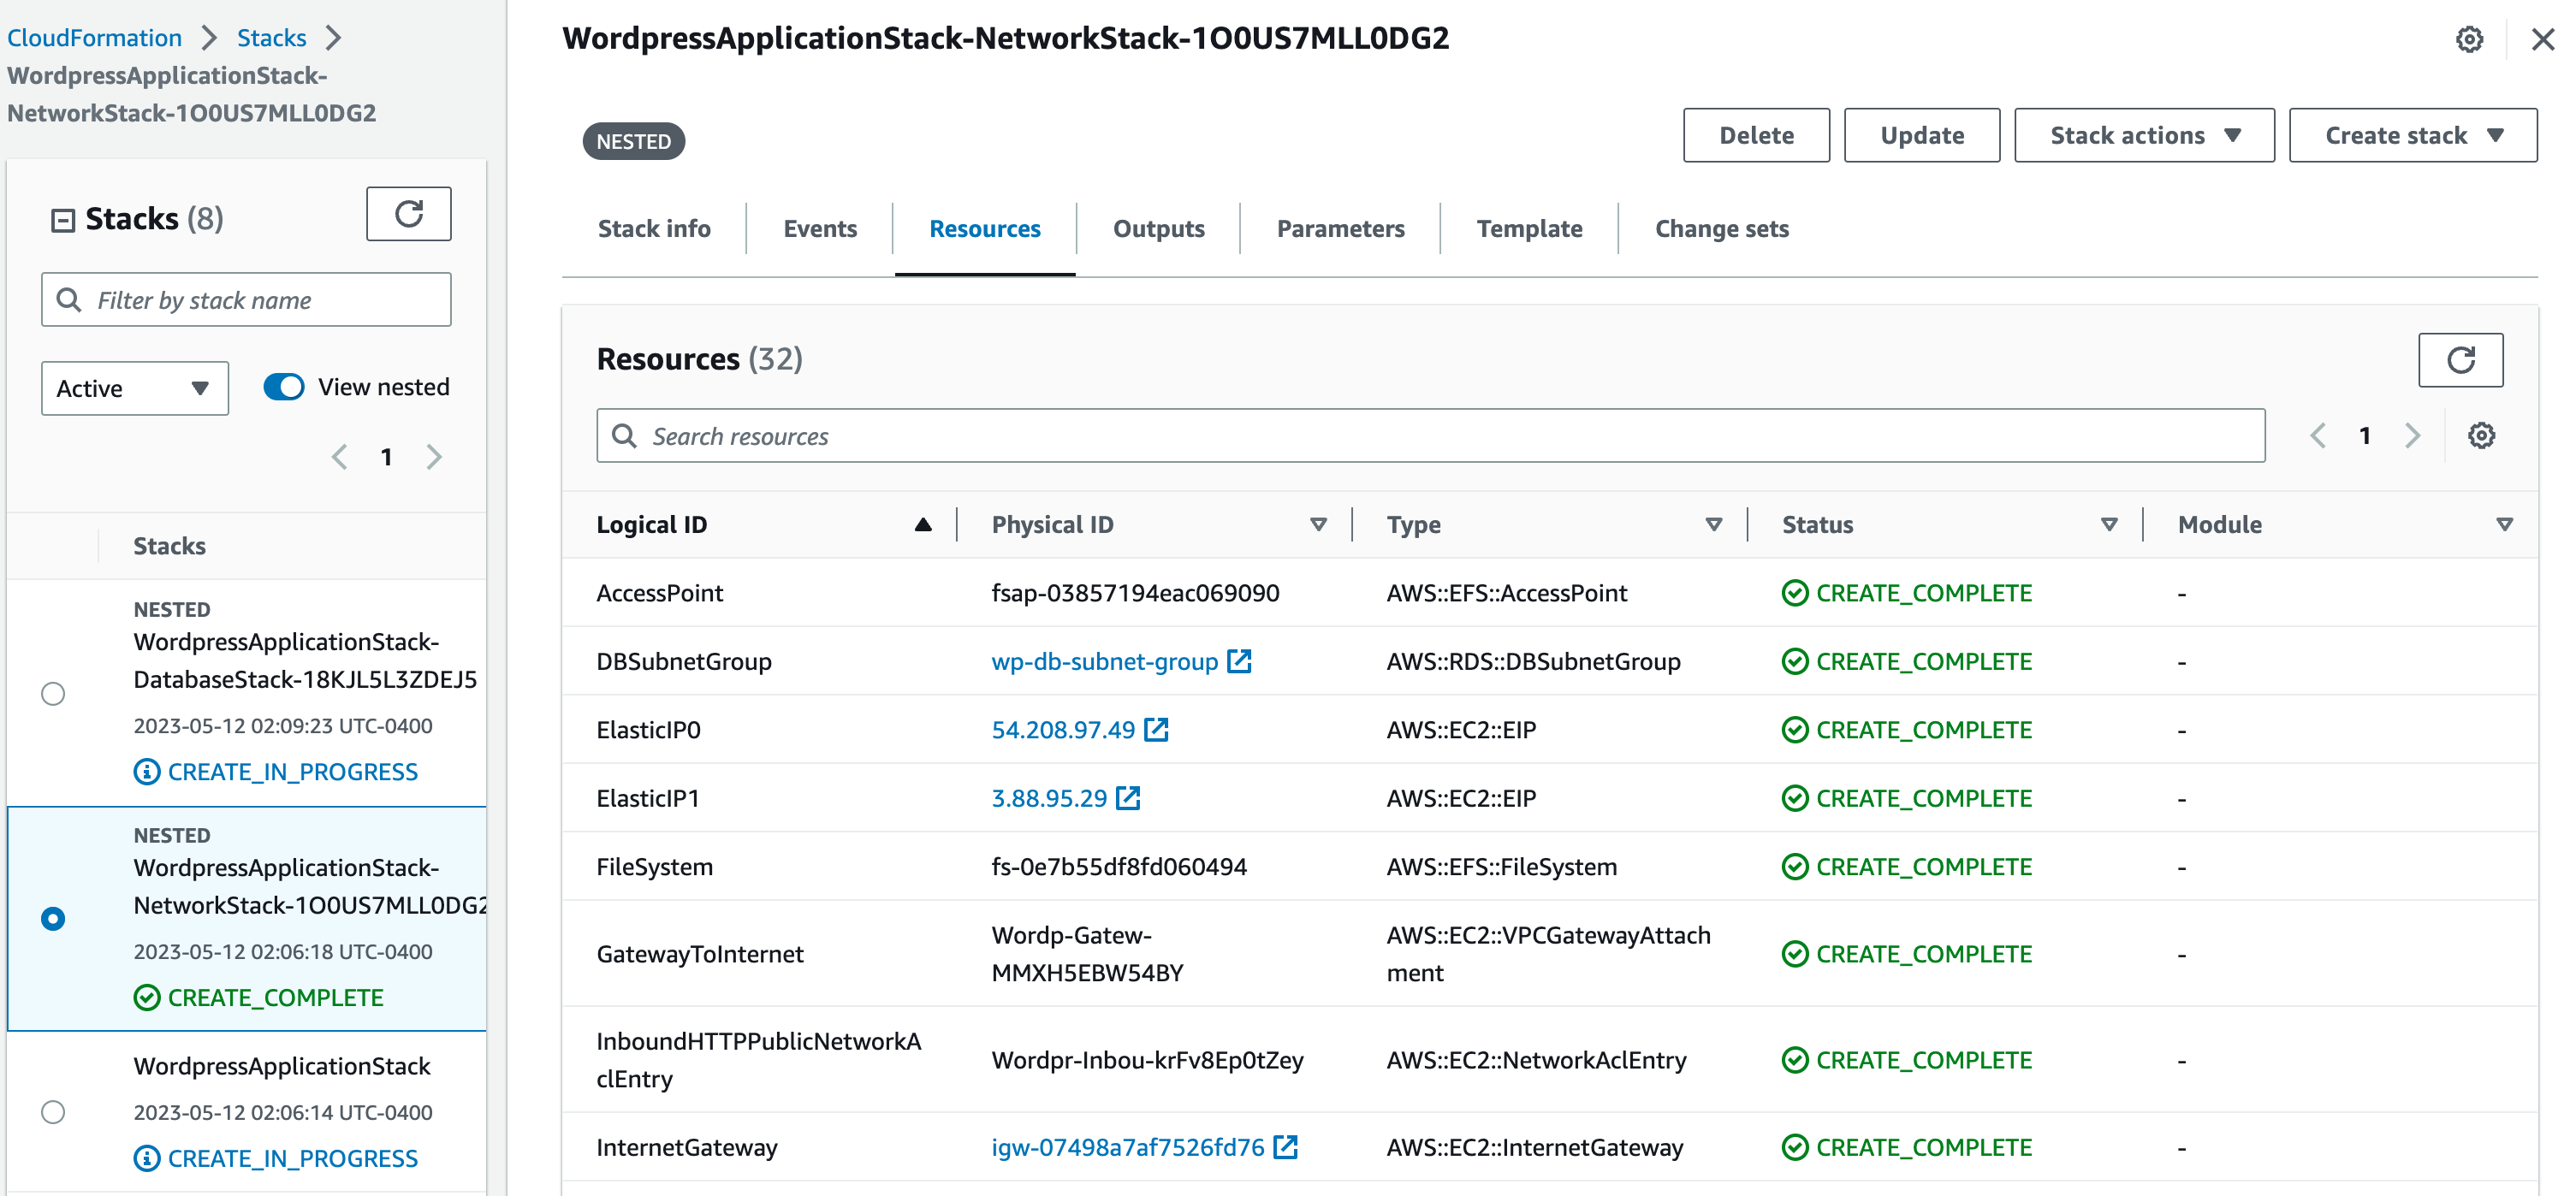
You can click around the other tabs, some of the are self-explanatory like Outputs and Parameters. Once you see CREATE_COMPLETE, the stacks are done creating and you should be able to go into other services and see the resources created such as the VPC, the RDS database, and the ECS cluster.
In order to see the application, navigate to the EC2 service and click on Load Balancers on the left menu. Select the “wof-load-balancer” load balancer and copy the DNS name. Here is what the Load Balancer page looks like:
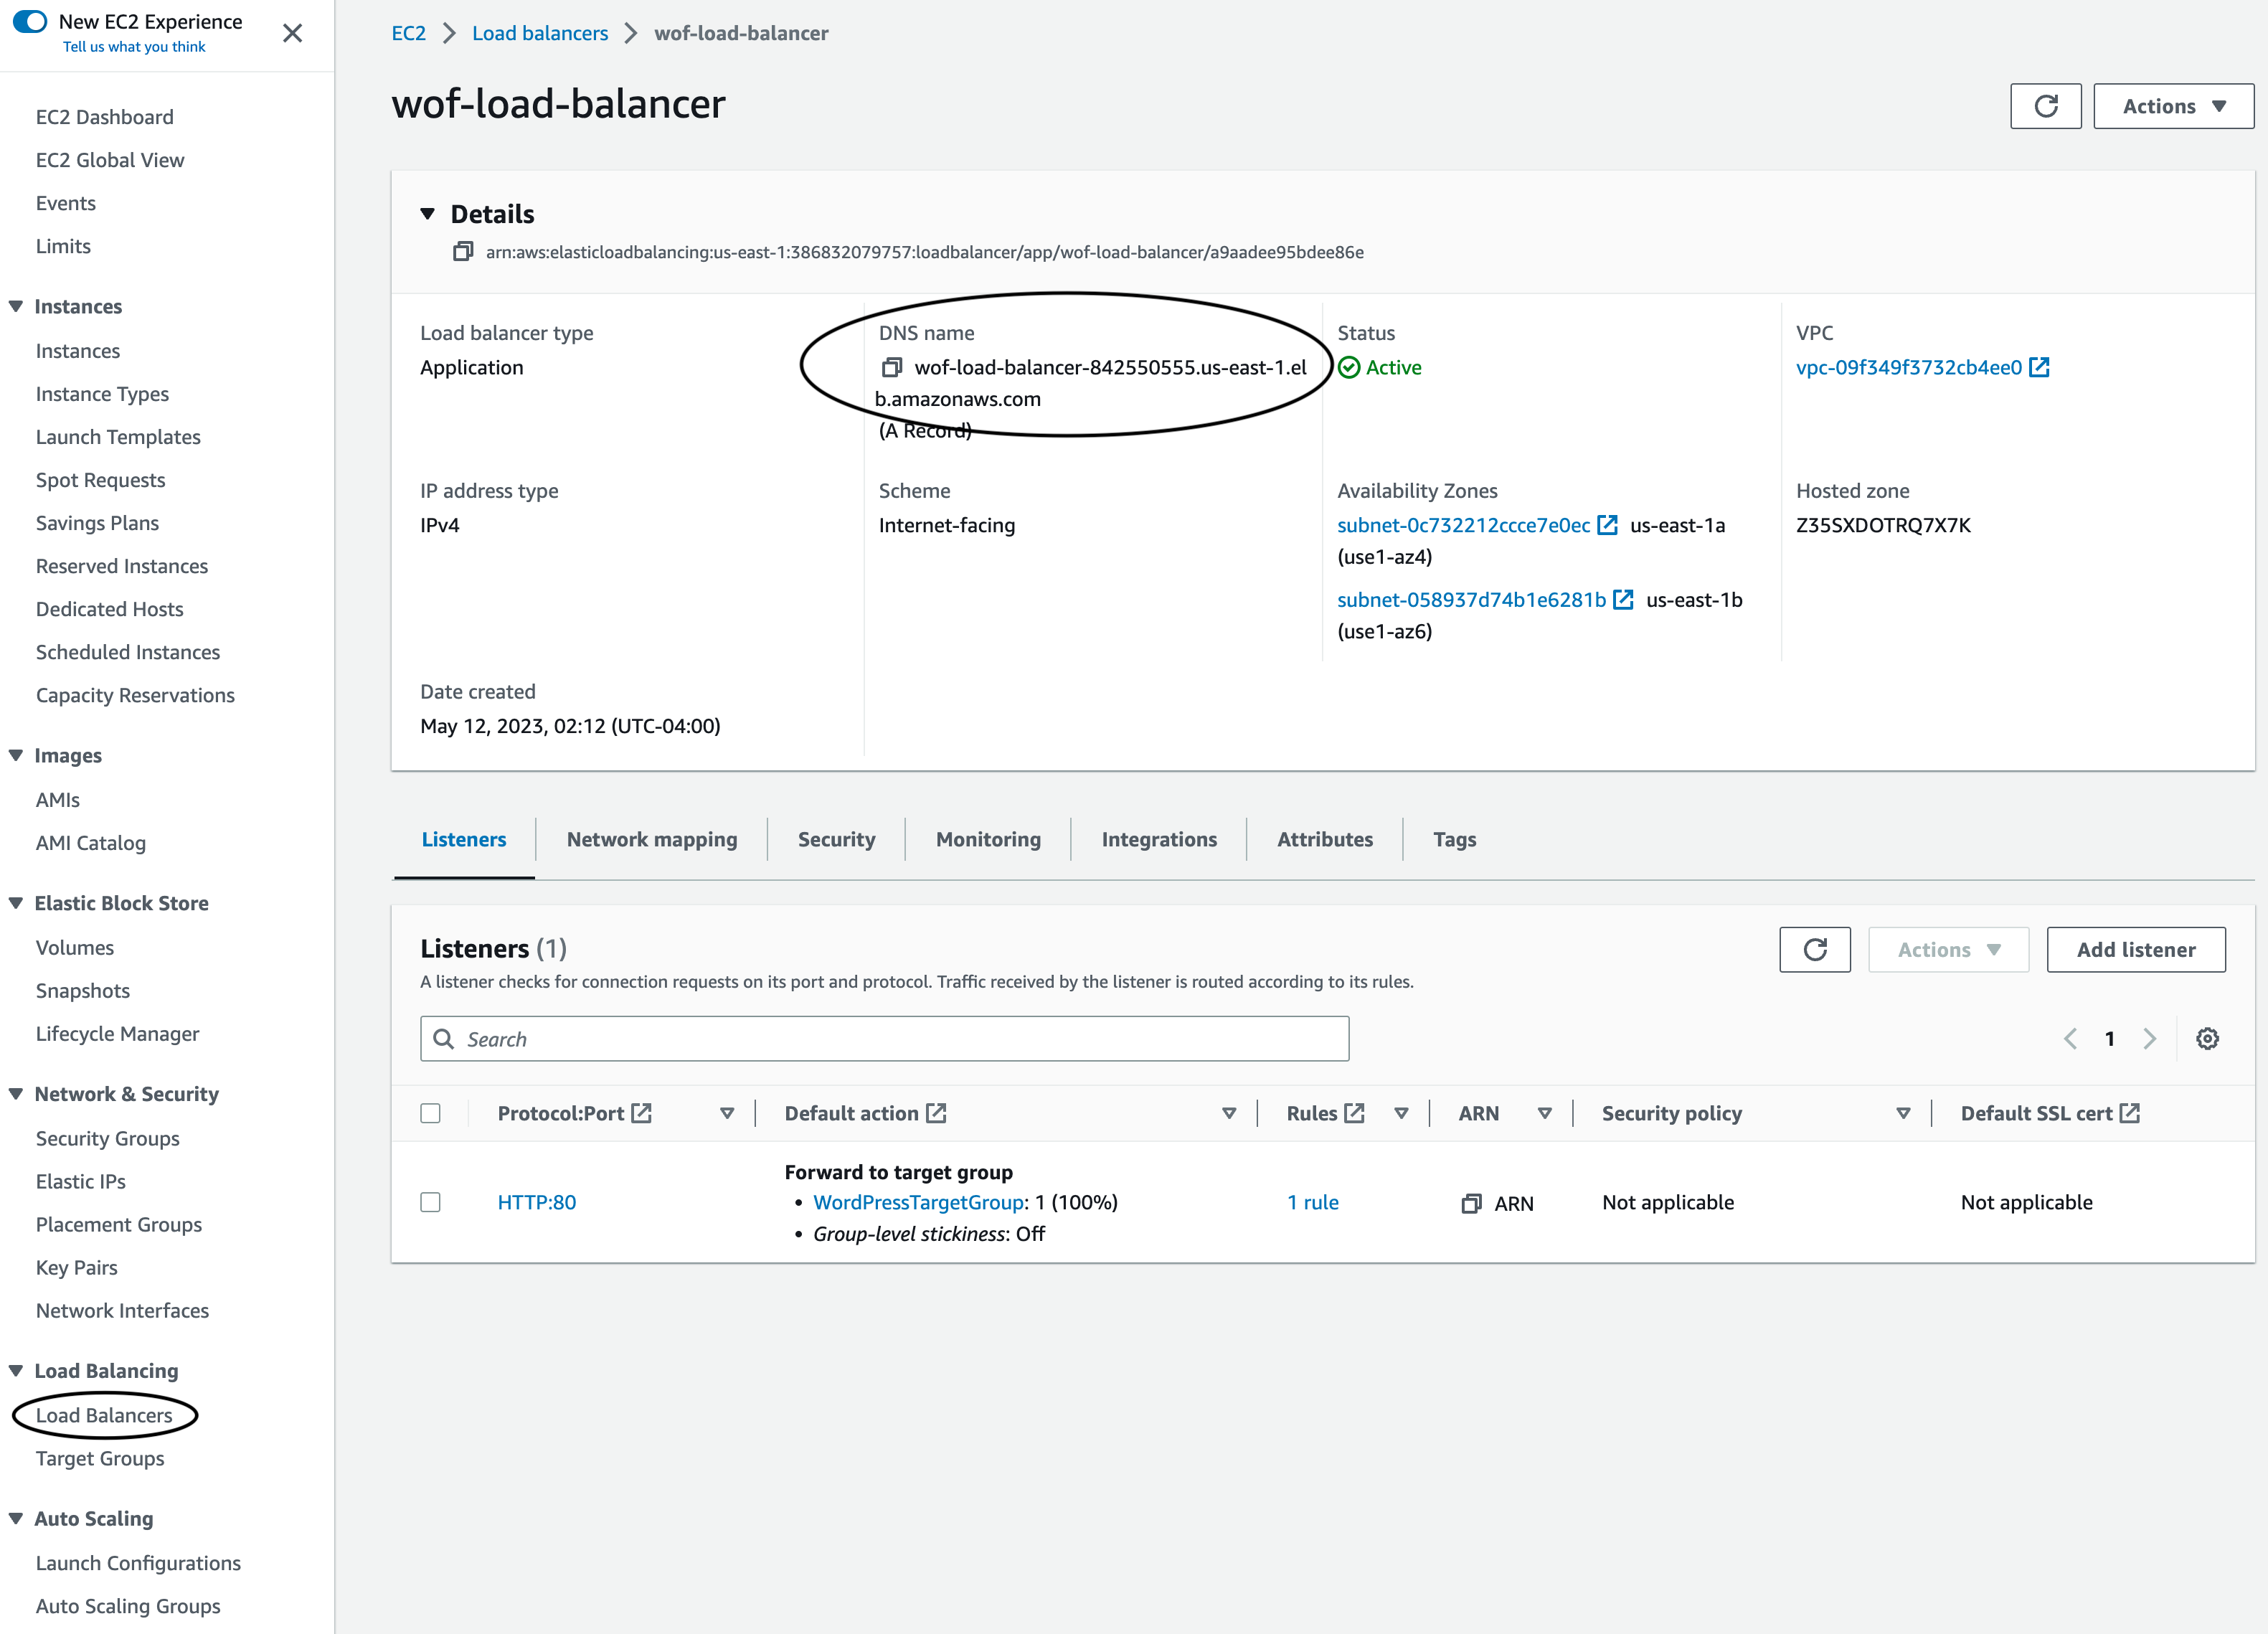
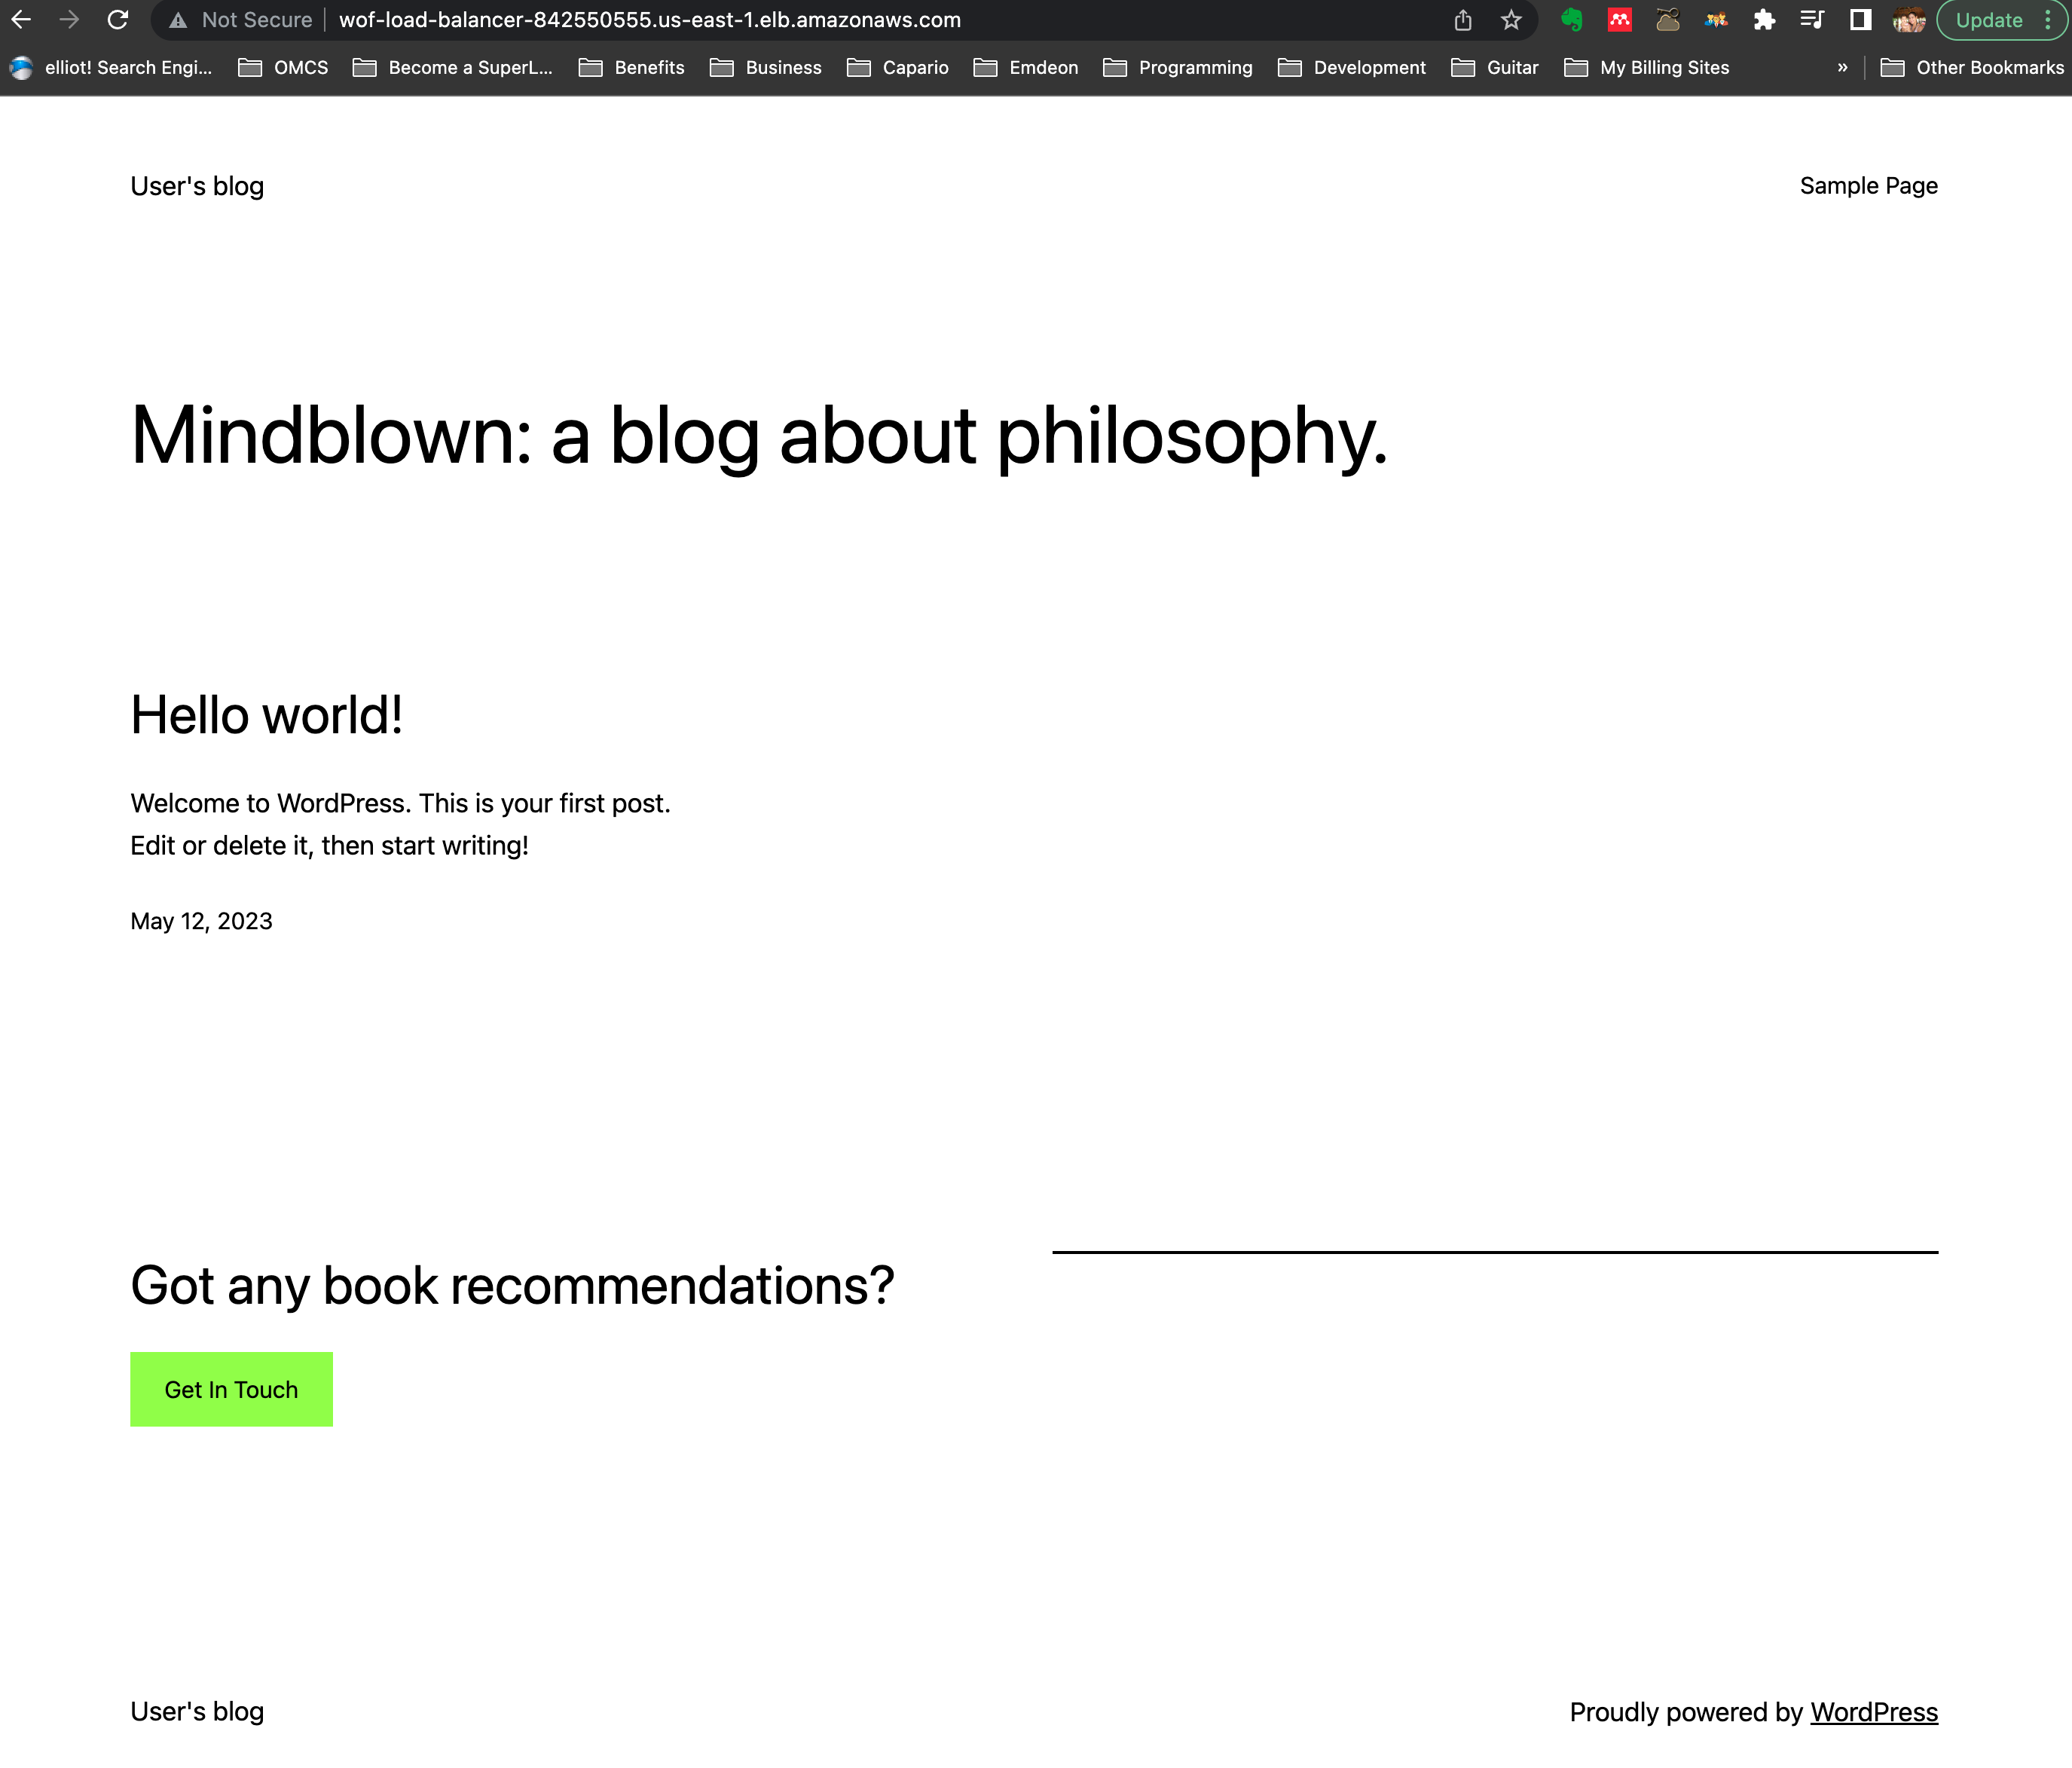
Now paste that URL in your browser and you should see the Wordpress application. To know more about the application, you can read the container’s documentation. If you are interested on using this WordPress application, it has all the information you need to manage it including initial passwords and so on. Here is how the page of the application looks like once you paste that Load Blancer URL on the browser:
Once you are done playing with the application or the stack, if you are not interested on keeping the application running, make sure you go to the CloudFormation service in the AWS console, select the stack and click on delete. This way you will not incur any further charges.
Terraform Scripts
Since Terraform is a multi-cloud tool, it uses a provider model. Each provider is an IaC representation of a cloud or a service. Providers are responsible for understanding API interactions and exposing resources. There are hundreds of providers for Terraform, including AWS, Azure, Google Cloud, GitHub, and more. Terraform supports the use of modules to organize and reuse code. A module is a container for multiple resources used together. Terraform Registry provides numerous pre-made modules that you can use. This is similar to our nested stacks in CloudFormation. To use Terraform you must install it on your local machine or your chosen environment.
HCL is primarily composed of blocks, arguments, and expressions. Here’s a simple example of what HCL looks like:
resource "aws_instance" "example" {
  ami           = "ami-0c94855ba95c574c8"
  instance_type = "t2.micro"
}
In this example, “resource” is a block type, “aws_instance” is the “block label”, and “example” is the “identifier” for this instance. The block itself contains two arguments: “ami” and “instance_type”. Blocks are the basic container structures in HCL. A block has a type (like resource or variable), one or more labels (like “aws_instance” and “example” in the above example), and a body that contains any number of arguments or nested blocks. Arguments assign a value to a name. They’re like variables in other languages. In the example above, “ami” and “instance_type” are arguments. Just like CloudFormation had Parameters and Outputs, Terraform has Variables and Outputs. Here is an example of what those look like in Terrform:
variable "VPCName" {
  type    = string
  default = "Wordpress on Fargate base infrastructure"
}

output "VPCId" {
  value       = aws_vpc.wordpress_vpc.id
  description = "VPCId of VPC"
}
As mentioned above, Terraform uses modules to make code reusable or more organized and easy to read. Terraform modules can be stored in a number of different locations. The source argument in a module block tells Terraform where to find the source code for the module. There are many different locations where you can import or keep your modules including local paths, GitHub, Bitbucket, Generic Git/Mercurial repositories, HTTP URLs, S3 buckets, and Terraform Registry. In the code provided, the modules are stored in a local path. Here is a snipped of how the network and database (as we showed above for Cloudformation) look like:
module "aws_network" {
  source = "./modules/terraform-aws-network"

  VPCName = "WordpressBlogVPC"
}

module "aws_database" {
  source = "./modules/terraform-aws-database"

  VpcId             = module.aws_network.VPCId
  VPC_CIDR          = module.aws_network.VPC_CIDR
  db_subnet_0       = module.aws_network.PublicSubnet0
  db_subnet_1       = module.aws_network.PublicSubnet1
}
In the snippet above, you can see the “source” argument which refers to the location of the module. The “VPCNmae” is an input variable for the “aws_network” module and just as above the variables for the database module get populated out of the outputs from the network module.
Terraform treats all scripts in the same directory as one unit, the separation in different files is optional and mainly for us humans to maintain organization of our code. All script files have a “.tf” extension. The first thing you need to do is install terraform on your machine or whichever environment you choose. Download the provided code and change directories to the terraform directory. It is recommended that you install the AWS CLI, since we are dealing with AWS resources here. You don’t absolutely need the CLI, but you do need to configure your AWS credentials. There are multiple ways to configure these, you can use environment variables or a file in a “.aws” directory under your home directory. This page shows you multiple ways to configure your AWS credentials. Once you have your credentials setup, then you need to initialize the Terraform working directory with the command “terraform init”. This will download the necessary provider plugins. The results should look like this:
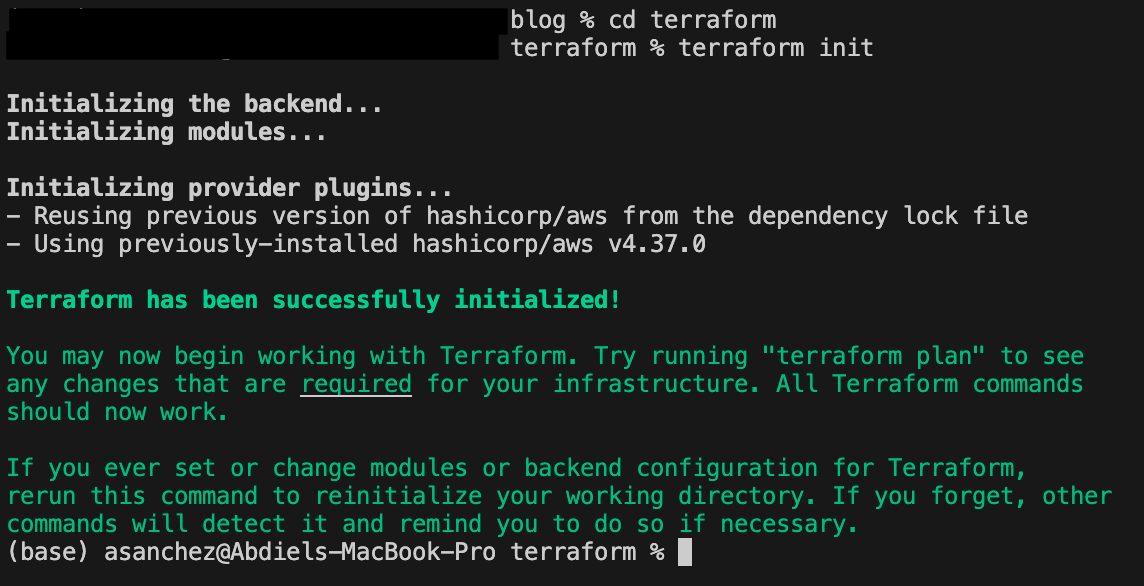
The “terraform plan” command allows you to check what changes terraform will make without making the changes. This allows you to review the changes before you actual make them. Terraform will show you the resources (the output is too long to display) and at the end it will provide you with a summary of what it will do like this: “Plan: 46 to add, 0 to change, 0 to destroy.” It will add 46 resources for the provided code since it will start from scratch. If you modify the template after it has been run, Terraform will let you know if it needs to delete, add or change any resources. If you are satisfied with the plan, the command you need to install the infrastructure is “terraform apply”. It will ask you to specifically enter ‘yes’ as a confirmation and it will start creating the resources. It will print on the screen what it is doing on each step. Once done it will look something like this:
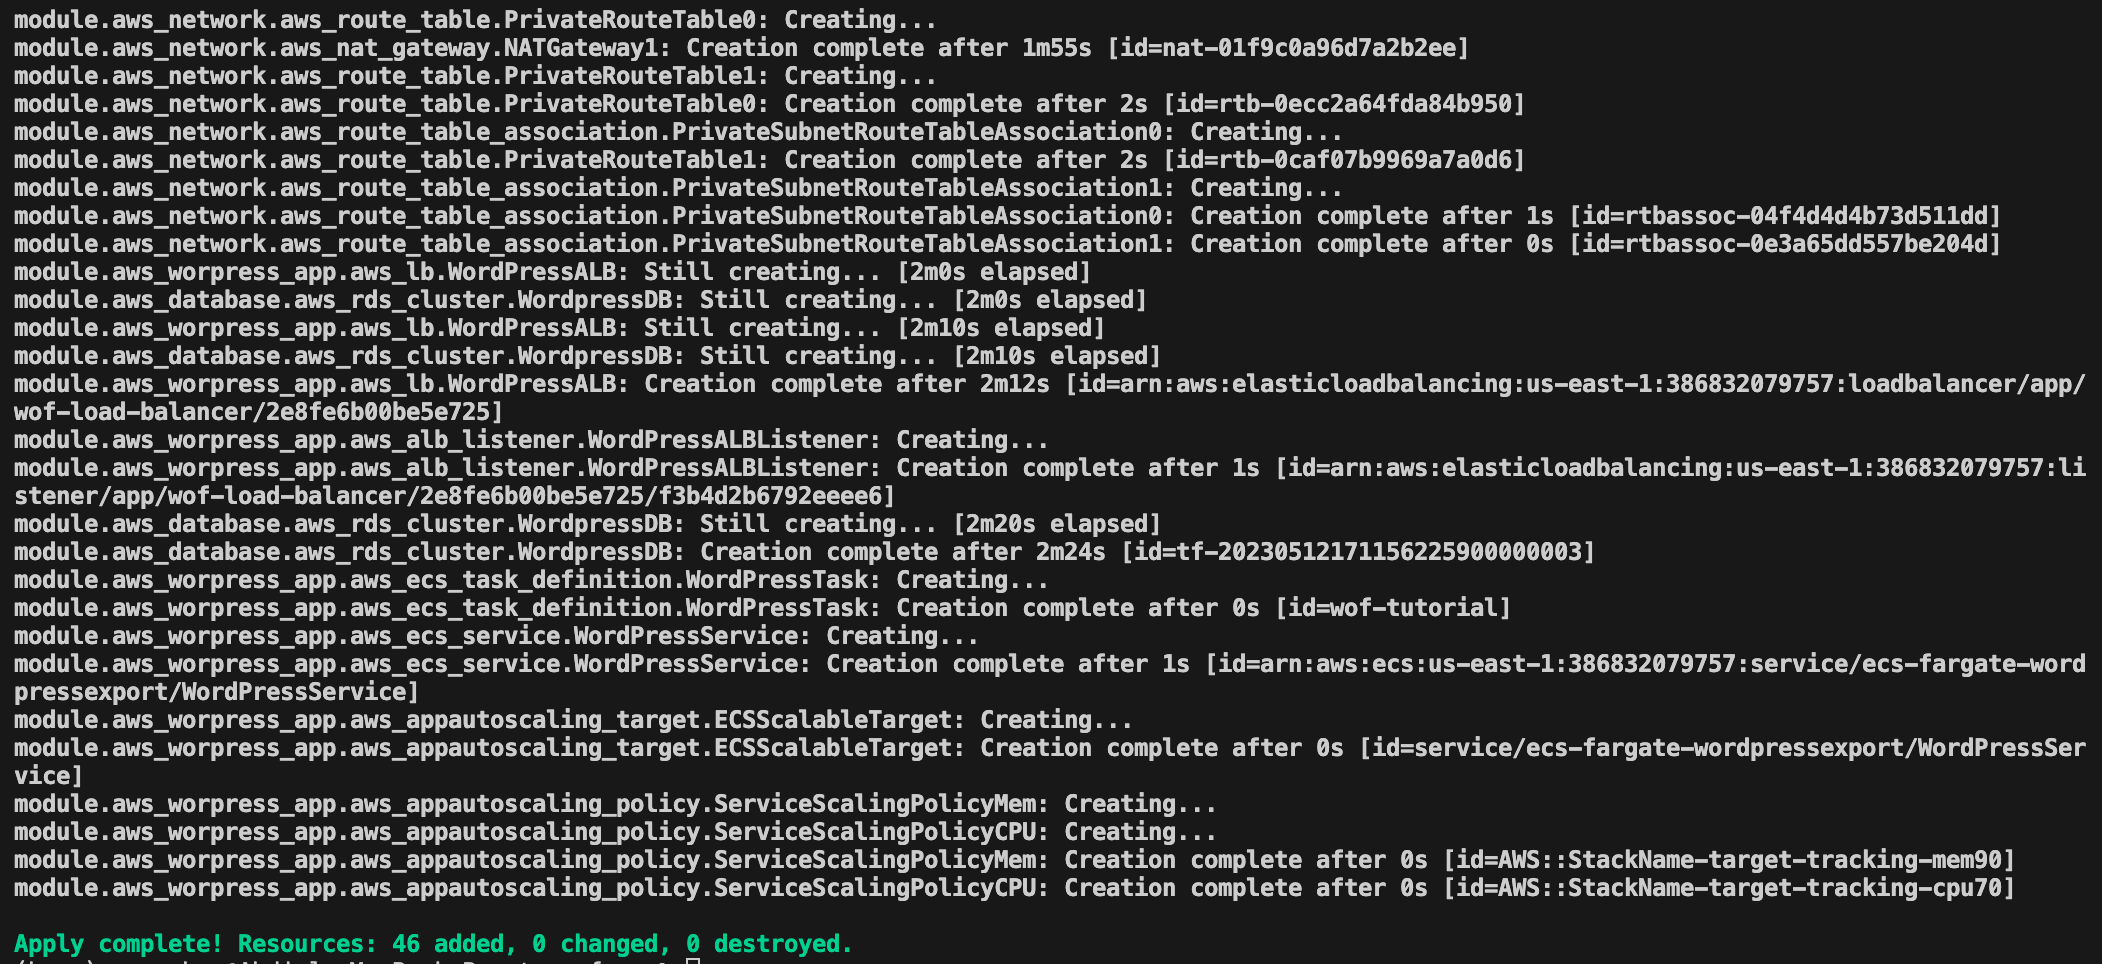
If everything is successful, you should be able to go to the AWS console, under EC2 service and click on Load Balancers. There you will find the load balancer created by the stack named “wof-load-balancer”. Copy the DNS name and put it in your browser and you should see the application pop up just as above in the CloudFormation section. As I said above you can go to the container’s documentation, if you are interested on learning how to configure the WordPress application.
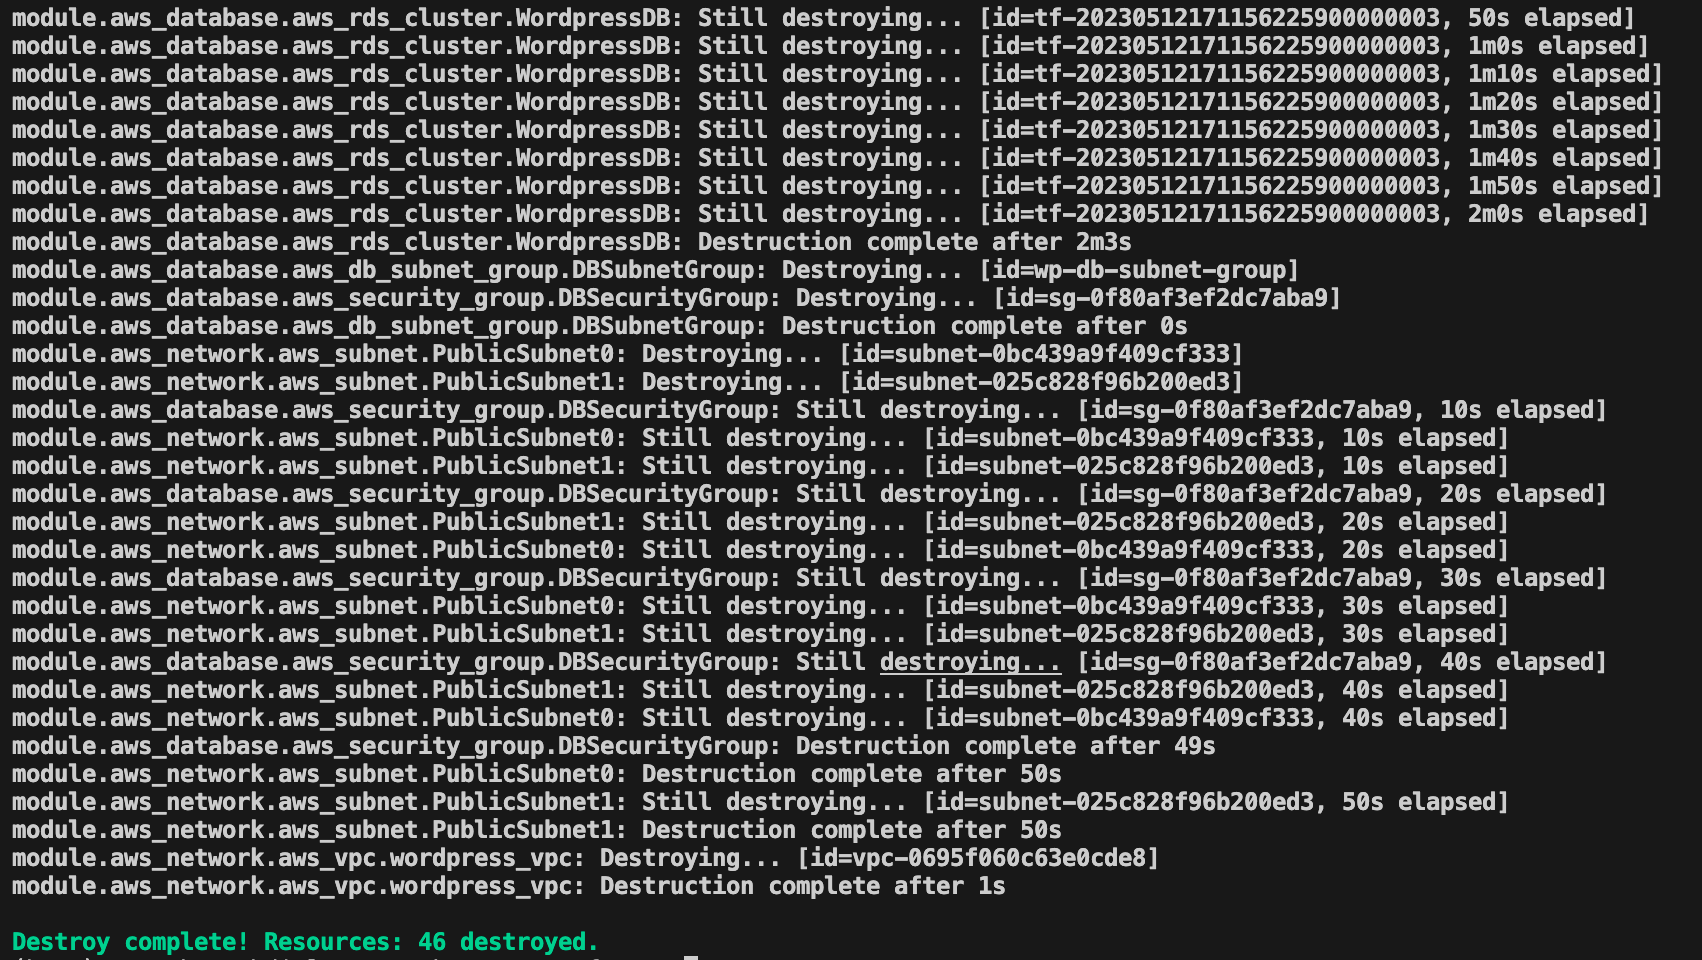
Once you are done playing with the application and/or the infrastructure, remember to remove it so you don’t incur in any additional cost. In terraform you will need to run the command “terraform destroy” in order to remove all the previously created infrastructure. After the destroy command is issued, it will look like this:
Conclusion
At this point you have read about CloudFormation and Terraform and have seen the same application deployed on the same infrastructure provisioned by both tools. The choice between Terraform and CloudFormation depends on many factors. If you’re working exclusively with AWS, CloudFormation might be the more appropriate choice. If you need to manage infrastructure across multiple cloud providers, Terraform’s flexibility and multi-cloud support make it a more attractive option. Additionally, if you prefer a tool with a large open-source community and ecosystem, Terraform would be a better fit. I hope that has given you some idea on the pros and cons of each tool, but more importantly, I hope it helps you embrace the infrastructure as code (IaC) practice. I have mentioned multiple other tools that you can investigate for this purpose. I will end with a quote from Mike Loukides regarding Infrastructure as Code: “If you’re going to do operations reliably, you need to make it reproducible and programmatic.”