Introduction
In recent years, many organizations have migrated their applications and infrastructure to the cloud to capitalize on the numerous benefits, such as increased agility, scalability, and lower costs. A popular migration strategy is the “lift and shift” approach, where existing applications are moved to the cloud with minimal modifications. However, the work doesn’t stop once the migration is complete. To truly maximize cost savings and efficiency, it’s crucial to optimize your cloud resources post-migration. In some scenarios, after a lift and shift migration the cost can even be higher. It depends on the infrastructure usage and the choices on infrastructure allocation during the migration. Another way to save after the migration is to refactor the applications to be more cloud native. The are many aspects or ways to setup applications in the cloud that are scalable, fault tolerant, and cost effective; however, usually it takes longer to refactor than to follow some of the infrastructure changes. These changes can be done while you are planning and executing your refactoring strategies.
In this blog post, we’ll explore ways to save money after a lift and shift migration, focusing on systems with multiple EC2 instances and RDS nodes. By employing these strategies, you’ll be able to achieve better resource utilization and lower costs in your cloud environment.
Strategies
My last lift and shift project had a large server footprint, plenty of local MySQL databases on many of those servers and an OLTP (Online Transaction Processing) Oracle database. A lift and shift seldom comes with some changes to the applications, except because of security. Being in the cloud, security is a bigger concern than on premises. Before the lift and shift there were changes done for security purposes such as securing all internal interactions as HTTP to HTTPS, secure EJB connections, database connections, etc. Considering the project was using a lift and shift migration strategy, changes were kept to a minimum. Here are some strategies to consider after doing a lift and shift migration that will help save on infrastructure cost:
-
Right-sizing EC2 instances
One of the most effective ways to reduce costs is by right sizing your EC2 instances. This involves selecting the appropriate instance type and size that matches your workload requirements. Monitor your instances’ CPU, memory, and network usage to identify underutilized instances that can be downsized. Likewise, if you notice instances struggling to keep up with demand, you may need to upsize them for better performance. We had estimated ahead of time which instances we would need based on the configuration of the on-premises servers; however, after running our workload we were able to identify underutilized instances and adjust them accordingly. We also found cases where we had to increase the instance size so they could perform the way we expected them to. -
Utilizing Reserved Instances and Savings Plans
AWS offers significant discounts for EC2 and RDS resources when you commit to using them for a longer period. By purchasing Reserved Instances (RIs) or subscribing to Savings Plans, you can achieve substantial savings compared to the on-demand pricing model. Evaluate your current and future workload requirements and choose a commitment plan that best suits your needs. -
Optimizing RDS nodes
Similar to EC2 instances, right sizing your RDS nodes is essential for cost optimization. Monitor database performance metrics, such as CPU utilization, connections, and storage, to determine if you can downsize your RDS nodes without compromising performance. Additionally, consider consolidating multiple databases on a single RDS instance to reduce costs. This last point makes a huge difference. We had originally started with two RDS nodes with different databases on them. After some time, we noticed that we could really merge them into one node without impacting performance. We tested it and it worked great. The savings from that effort were significant. -
Implementing Auto Scaling
Auto Scaling allows you to automatically adjust the number of EC2 instances or RDS nodes based on the demand. By implementing auto scaling, you can ensure that your infrastructure scales up during peak hours and scales down during low usage periods, reducing overall costs. This is a great way to manage your resources; however, it might depend on your applications if they are able to support auto scaling before being refactored. -
Leveraging Spot Instances
Spot Instances are spare EC2 instances that AWS offers at discounted rates. If your workloads can tolerate interruptions, consider using Spot Instances to save up to 90% compared to on-demand pricing. Be sure to implement a fallback strategy, such as using on-demand instances when Spot Instances are not available. -
Deleting unused resources
As your cloud environment grows, it’s crucial to regularly audit your resources and delete those that are no longer needed. This includes unused EC2 instances, EBS volumes, and RDS snapshots. Deleting unused resources helps to minimize storage costs and streamline your infrastructure. You should invest in automating the creation of the infrastructure using tools such as AWS CloudFormation, Terraform, etc. This will help making sure you don’t have unused resources left behind. It is still a good idea to periodically audit your account for unused resources and figure out why they were left behind. Your team should be trained to be cost conscious and adapt to the rules and realities of this new environment. -
Monitoring and reporting
Continuously monitor your cloud resources and their associated costs using tools like AWS Cost Explorer and Trusted Advisor. Set up billing alerts to keep track of your spending and identify cost-saving opportunities. Regular monitoring and reporting will help you maintain an optimized infrastructure and prevent cost overruns. -
Using AWS Instance Scheduler
The AWS Instance Scheduler is a service that helps you reduce costs by allowing you to automatically shut down and start EC2 and RDS instances according to a predefined schedule. This is particularly useful for non-production environments, such as development and testing, where resources may not be needed outside of working hours. The resources for each environment can be schedule based on the needs of your organization. For example, we had development on a fixed scheduler every day and completely off on the weekends. Our testing environment had different requirements; hence, we did not do a fixed schedule. We had an offshore team that tested certain areas of the system, so we kept up the resources they needed for such testing 24/7 during the week, but we turned them off on the weekends. The rest of the resources did follow a fixed schedule. As you can see, you can tailor this service based on your needs to achieve infrastructure cost savings.To use the AWS Instance Scheduler, you’ll need to:
-
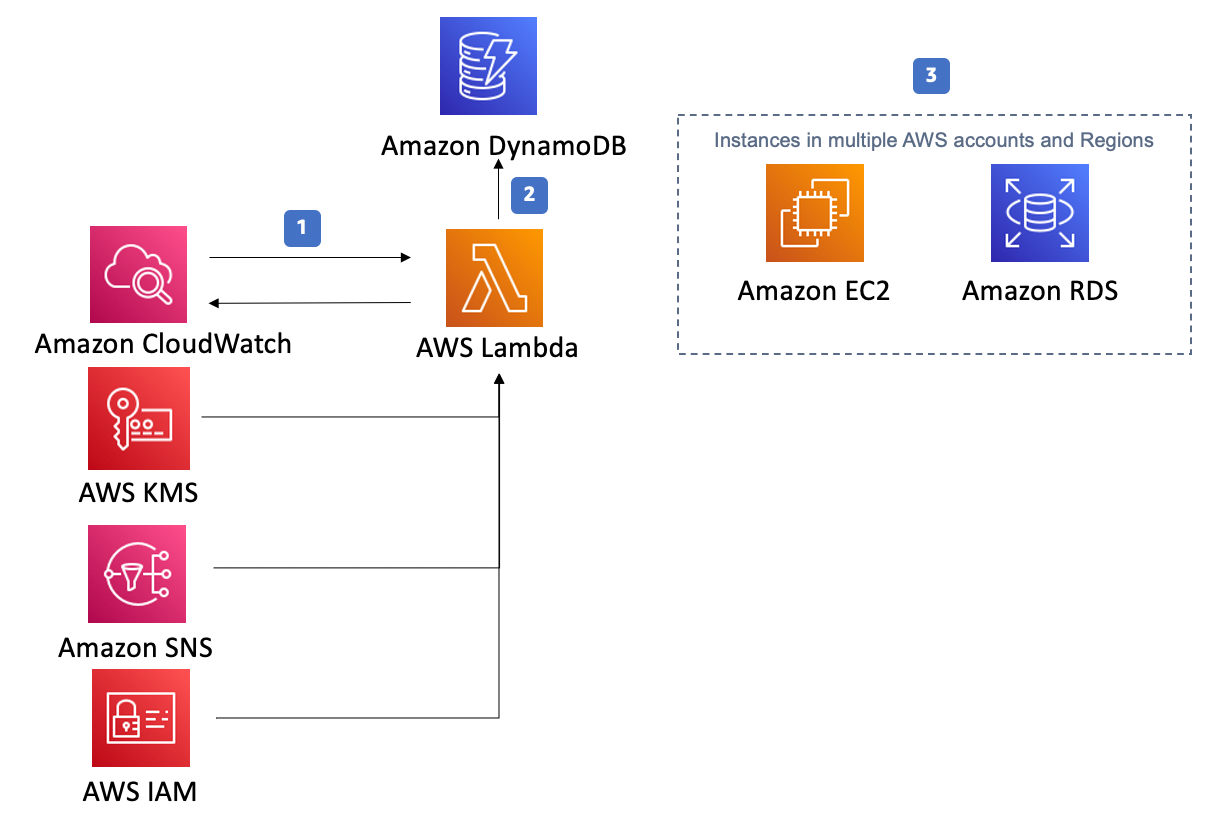
Set up the Instance Scheduler infrastructure: Deploy the Instance Scheduler CloudFormation template in your AWS account, which creates the necessary resources, such as AWS Lambda functions, Amazon CloudWatch events, and Amazon DynamoDB tables. This template is provided by AWS, and you can find it in the AWS Instances Scheduler documentation pages. Here is an overview of the resources created by the template:
-
Define schedules: Create schedules in DynamoDB that specify the desired start and stop times for your instances. You can create multiple schedules for different time zones, weekdays, or weekends. In DynamoDB you can setup Schedules and periods. One schedule can have multiple periods. The documentation goes over how to setup the schedules and periods on the DynamoDB table. This other article shows a sample of the scheduling that I like to include because the way it is setup is not necessarily intuitive and this can save you some time.
-
Tag instances: Assign tags to your EC2 and RDS instances that correspond to the schedules you’ve created. The Instance Scheduler, via the lambda function, will use these tags to determine which instances should be started or stopped based on the active schedule.
-
Monitor and adjust: Review the Instance Scheduler logs and metrics to ensure your instances are being started and stopped as intended. Adjust your schedules and tags as needed to optimize cost savings based on your application and environment requirements.
Keep in mind that there are some intricacies to consider when using the AWS Instance Scheduler:
- Ensure that your applications can gracefully handle the shutdown and restart of instances. For example, consider implementing health checks and retry mechanisms for database connections in your application code.
- Take note of any dependencies between instances, such as multi-tier applications, and ensure that they are started and stopped in the correct order. For example, in our schedules, we setup the databases to stop 15 minutes after the EC2 instances and start 30 minutes before the EC2 instances. This way we ensured that the databases were up by the time the instances were up and that the instances could shut down gracefully with access to the database. That is one example, but only you would know the instances dependencies on each other and in databases so you should keep that in mind when setting up your schedules.
- Be aware of potential data loss if you’re using instance store volumes, as the data is not persistent across instance stops and starts.
- If you’re using Spot Instances, be mindful that they may be terminated by AWS when there’s a capacity shortage, even if the Instance Scheduler is set to keep them running.
- If you are using Windows EC2 instances, the AWS Instances Scheduler supports hibernating the machines (assuming the EC2 instances were provisioned with hibernation enabled). This might be a good choice instead of stopping the instances, especially with older software that one might be afraid that may not start correctly if just set to launch on start up.
- Make sure your applications start automatically when the server starts. This might be obvious, but worth noting because you don’t want to have manual intervention to start applications in all servers. In our case we had over 70 servers.
By incorporating the AWS Instance Scheduler into your cost optimization strategy, you can further reduce costs by ensuring that instances are only running when they are needed. This will help you maximize cost savings and maintain an efficient cloud environment. This article by Microtica has a simple tutorial for AWS Resource Scheduler.
-
Conclusion:
A “lift and shift” migration is just the beginning of your cloud journey. To fully leverage the cost-saving potential of the cloud, it’s essential to optimize your resources post-migration. By right-sizing EC2 instances, utilizing reserved instances and savings plans, optimizing RDS nodes, and implementing auto scaling and spot instances, you can significantly reduce your cloud infrastructure costs. Regular monitoring and cleanup of unused resources will ensure that your cloud environment remains efficient and cost-effective in the long run. Finally, make sure instances are only running when they need to be running by using the AWS Instance Scheduler which is especially useful for non-production environments. Ultimately, you must focus on refactoring your application to be more cloud native every day in order to truly take advantage of the cloud and reduce cost effortlessly. Using these techniques, especially the AWS Instances Scheduler, we were able to save over 200K dollars a year in cloud costs.